The leather vest is very easy to make. It only requires cutting the material using the pattern and sewing (or gluing) the shoulder seams. If you use fabric, select something that won't fray, such as felt, or treat the edges with Fray Stop.
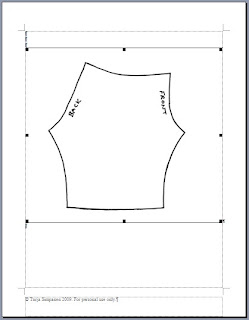
You can find the pattern here.
 As you can see, the front of the vest won't close. You can make it close by modifying the front edges. First draw the desired shape in the pattern, fold the paper in half, and then cut the pattern. This way, the front parts will be identical.
I made a dressing gown for my Sybarite doll using a shirt I bought from a second hand shop. I cut the parts so that the sleeve cuffs and hem are from the hem of the shirt. I also got the edges with buttons and button holes directly from the shirt, which was nice, because I hate sewing in buttons and I am really bad at making button holes. The collar is a little piece from the shirt collar, so that also saved some work.
I like the neckline as it reminds the neckline of some historical dresses. I think I'll have to try this again later with fabric that is not this transparent.
I have made some outfits from Mari DeWitt's book Vintage Clothing for the Fashion Doll (tilattavissa myös Suomesta). It is an excellent book with clear instructions and patterns and the outfits are really nice.
Below are some of my dolls modeling the outfits I have made. The dolls are from left to right: Chinoiserie Red Moon Silkstone Barbie, Model of the Moment Daria, and Spa Giftset Silkstone Barbie. The outfits are from left to right: Editorial Suit, Arts in the Afternoon, and Cocktail Fashion. The patterns for each outfit also include a pattern for a hat, but I have not made those.
 Here is a back view of the same:
 Side view:
 I also took some pictures as I was swapping the outfits around. The doll with platinum blonde hair is Hollywood Royalty Lana Turner.
 This outfit is called Retrospective:
 The other outfits in the book are:
- Holiday in Paris (a bubble dress),
- Limelight (pull-on stretch velour dress with a double tulle flounce),
- Best Bow (dress with fitted drop waist bodice with an attached full skirt and large fabric bow),
- Basic Dress (dress made of two pieces, suitable for beginners),
- Straight Sheath (A-line dress),
- Woodstock (1970s style rib knit one-piece jumpsuit and long fleece vest),
- Swimsuits (one and two piece),
- Pink Punch (felt midi coat with matching mini skirt and satin shell top),
- Gingham Dress (for the smaller busted fashion doll).
At the end of the book, there are instructions for scaling the patterns to fit 15-16" fashion dolls and instructions for making a hat using buckram.
I added a list of paper model sites to my home page. Here are some pictures of paper models I have built.
The first one is Bugatti Racer from Fiddler's Green.
Haunted Paper Toys is a fun site and I have made several of their models. The first one is a graveyard set.
And here is a closeup with some gravestones and undead gummy bears.
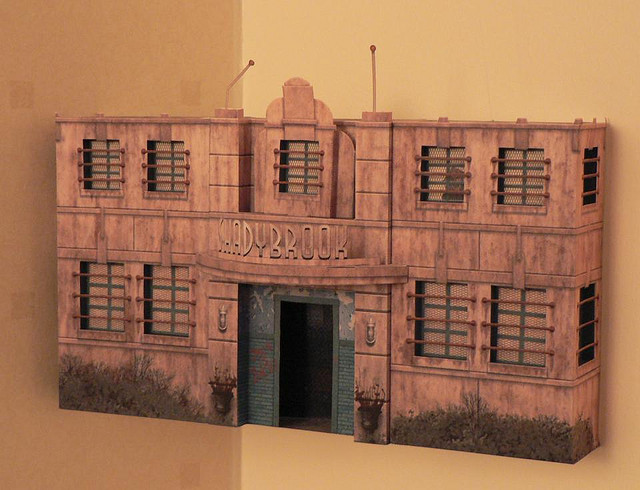
Haunted houses include Shadybrook from Haunted Dimensions.
As I am interested in ships, I have also built NYK Castor.
The Hovel turned out to be easily scalable. I built a part of it in enlarged form to use as a background for toy photography.
On the Hartsilapset forum, I was asked how I make the pattern PDFs so that the patterns print in correct size. As that information could be useful for others as well, I decided to post it here.
I am sure there are more sophisticated ways of doing this, but this method does not require any specific software, just what comes with your computer and scanner.
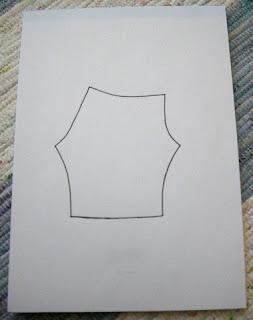
First, you need a standard size paper such as A4 or Letter. Basically anything your text processing software supports. I use A4. Trace your pattern on the paper with a black pen.
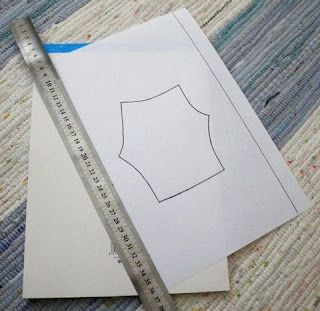
 Draw side margins on the paper. The margin width can be anything you choose, but make sure it is not too narrow for your text processing software. I use 2 cm margins to make sure that the PDF can also be printed on Letter size paper.
 When scanning the pattern, select an area from the left side margin to the right even if it means including a lot of empty space. Scan in black and white and select a high resolution. I use 600 dpi. This is because you need an oversized image that will not fit the page in 100% size. Save the scanned image to the hard drive.
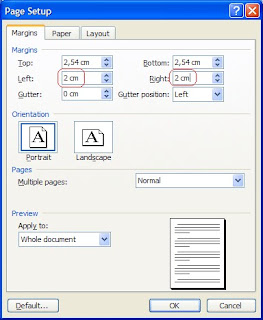
 Create a new document in your text processing software. Make sure that the page size in the program is the same as the size of the actual paper you used when scanning the pattern. Set the side margins to the same width as you used on the paper.
 Now the page setup corresponds with the original paper. Insert the scanned image to the document. As it is oversized, its size will be automatically decreased so it will fit between the margins.
 So, in this case I originally had an A4 paper with 2 cm margins and the pattern traced to it. Then I scanned the image from margin to margin. When I inserted the scanned image to an A4 page with 2 cm margins in the software, I ended up with an exact copy of the original paper.
The last stage is to print the document into a PDF file. Some software include this function, but if yours does not, you can use a free converter, such as PDF995.
If you are going to print the PDF file to a different paper size, such as A4 to Letter or vice versa, remember to check that the "Fit to page" checkbox (or something similar) is not marked. There should be no resizing of any kind during printing or you will end up with incorrect pattern size.


 ). All you need is the paper and a color inkjet printer. The transfer paper is not cheap, but you can fit a lot of these tiny pictures on one sheet to save material.