Thursday, June 24, 2021

Indoors tent for kids

The project I did after the graded one in May was the sort of tent you use indoors and spread over a table. It was for a daycare place, and we just had the age of the kids (3-4) and the measurements of the table with the table legs marked in the drawing. Otherwise we got free hands as regards the placement of the windows and the overall design.

I started by figuring out the size of the windows to make sure the openings were small enough, so the kids wouldn't be able to stick their heads through them. It's amazing what you can find in the web. I actually found a table (made by CDC) of children's (up to 36 months) average head sizes. To be safe, I used band to divide the windows into four 10x10 cm panes.


I framed the door with 10x20 cm "bricks" made of fabrics with different textures. The idea was that in addition to looking nice, the wall would be interesting to touch.


The parts of walls between the windows got giant flowers in them. I also put a row of similar "bricks" around the bottom edge as a footing, because the base color of the tent was a bit boring as the color looked like sandstone.


Here's the finished flower.


And another one on the other side.


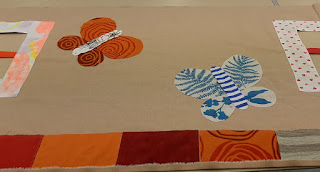
I also put some butterflies on the walls.


Finally, I added some flowers on the roof to make it more interesting.


This was the biggest sewing project I've ever handled. It required a lot of planning just in regards to the direction of sewing to make sure the main part of the fabric would stay on the left side where there was room for it.


We didn't have a table of the correct shape in the classroom, so I had to spread the tent on some chairs to get these pictures. In the first one, you can also see the door flap I added in the end. The circumference of the tent was 5 meters, so it was clumsy to handle in all stages of the project, but especially clumsy when I was sewing the top (the roof) in place.


Tuesday, June 1, 2021

Shoulder bag

The spring semester is over now. The course that lasted from mid-April to the end of May got graded last week. The course was about making a product or series of products using recycled materials. I chose jeans fabric the school had in large quantities. It counts as recycled material, because it's factory leftovers that would be wasted otherwise.

I didn't do everything in the proper order, but I will present things in order here. So, the first thing is the presentation picture of the product. I actually drew this last, when all the bags were finished.


I made a series of 5 bags, which meant I had to cut parts for the entire series first. The picture below shows parts of the lining drawn with chalk on the reverse side of the fabric. It is so much easier to avoid wasting material when you're cutting a batch instead of just pieces for 1 bag. 


Here are all the pieces needed for the bags. The fabric with flowers is for the bottom part of the lining. It's the most visible part of the lining, so I thought it would be nice to have something more interesting there.


I made the front pieces by weaving strips of the fabric into a chessboard pattern. First, I sewed the strips to the upper and left edges, and then, after weaving, to the opposite edges.


Here are the finished front pieces. Each was to be cut in half diagonally, so there was one extra for each. That actually messed up my calculations at one point as I was calculating the fabric needed for 5 halves, not realizing I needed to make 3 rectangles for both color combinations.


The way to cut these in half was to first stitch diagonally twice and then cut between the stitched lines. I folded the pattern in half, placed in on top of the piece, and then used the folded edge as a guide for the first stitching. The second was easy to do using the first as the guide.


When I had the two halves, I first sewed the 3 stripes together and then the resulting wider piece in between the halves. As you can see, the front pieces were complicated and they took a lot of time to make. Too much time to make this project in any way financially viable. The two-tone pieces in the picture are for the backs. The original plan was for the back to be black, but as I couldn't get wide enough pieces of the jeans fabric for that, I changed the plan. 


I didn't take pictures from the assembly stages, so here is a finished bag. There were 5 identical bags, but I only took a picture of one as that was part of the assignment (taking a product photo).


The project looks fairly simple described this way, but it was a lot more complicated as it began with a lot of experiments with different techniques. Mostly failed experiments, I might add, but of course even a failed experiment is a good thing, because it tells you that is not the way to proceed.

After the bags were finished, I decided to try an alternative technique. The front pieces took a lot of time to make, so I tried different material and slightly different order of doing things. The experiment below is made of textile band. Its edges did not require stitching, so that reduced the amount of time required quite a bit. I haven't used this for anything yet, but I might make another bag for myself later (the 5 bags I made went on sale at the school).


My grade for the course was 5 (on a scale of 1-5), so I was quite pleased. Good grades are always nice, even when you don't actually need them. What they show me is that I'm doing things right.

 I had time left over after this project, so the teacher gave me a customer project to make. I'll be posting about that later.