


This is the second part for the video in the last post. It's about the best of the three books, which has patterns in three different sizes for Tonner and Madame Alexander dolls.
Showing posts with label pattern. Show all posts
Showing posts with label pattern. Show all posts
Sunday, April 3, 2022


Sunday, March 27, 2022
Barbie clothes
I have shown some of the doll clothes in the video in an earlier post, but in the video, you can also see pictures from the book, showing the original outfits.
Sunday, February 6, 2022
Using a stopwatch app, future plans, recycling leather
I wanted to know how long it really takes to convert a t-shirt to a long-sleeved one, so I downloaded a stopwatch app and set to find out.
Then I copied several patterns at once as I knew I wanted to make these at some point.
Buying new leather is not something I like to do, so second hand stores are a great source of materials. I got a great deal on some used leather jackets.
Thursday, January 6, 2022
Making the neckline of the yellow bodice
In this video, I'm showing how to alter a dress pattern to make the notched neckline of the yellow bodice shown in an earlier video. You need to know how to make a dress with a lining, because I'm only showing the changes needed for the pattern and what needs to be done differently when sewing the dress.
Sunday, November 28, 2021
Copying patterns from a Burda pattern sheet
I got a Burda magazine on loan for a weekend to copy some patterns I wanted to have for making the clothes later.
Sunday, November 14, 2021
T-shirt gets a new life, part 1
The video below is the first part about altering an old t-shirt. The process starts with assembling, copying and altering the pattern to fit me.
Saturday, October 30, 2021
Leftovers
You may recognize some of the fabrics I'm using for this project. I wanted to use all the little pieces of fabric left over from the earlier school projects, so I came up with this idea.
Sunday, October 10, 2021
Pinstripe Blazer
In this semester, we have been making clothes with lining. We started with dresses, but I'm starting here with the pinstripe blazer I made. The pattern is "Blazer 101" from the English language version of Burda, issue 10/2018. The description below explains the basic steps, but I may have omitted something, so the best source of instructions for this is the magazine as it has quite detailed instructions of making this.

This is European size 40, which is equivalent to modern US size 10. Pattern sizes can be so confusing, because magazines like Burda use modern sizing, whereas the McCall's coat pattern I've got has totally different sizes. I read somewhere that it's because they use sizes from 50 years ago. So, my size in the coat pattern is US size 14. You really have to go with the bust and hip measurements (waist is easy to fix, if required).
My bust and hip are basically the same as in Burda's size 40, but my waist is currently 80 cm, whereas the pattern has 74 cm, so I had to add 6 cm to the waist. I also have shorter arms. The pattern had 63 cm, which I had to shorten to 60 cm.
After copying the pattern and making the required changes, it was time to cut the fabric. I've always enjoyed making jigsaw puzzles, so it's kind of fun trying to find the arrangement with the least fabric wasted.

The next step was adding interfacing to the parts that needed it. I pinned the pieces of interfacing in place as I was cutting them, because it's so easy to get confused about what goes where. Also, this way the pieces stay in place while you're moving everything to the heat press, and you just need to remove the pins before pressing.

Then I sewed the darts and made the pockets, which are double welt pockets with flap. This is just one design that uses welts. It's interesting to see how many pocket designs incorporate the same elements, just in slightly different combinations.

When the welts were ready, it was time to add the flap. It's hard to align the stripes when the darts make them angled, but I'm pleased with this result.

The lining fabric I got for the blazer was red, so the outer pocket fabric is also red. It was fun to get some color to the blazer, even if it's in places where it doesn't show when you're wearing the garment.

The next part was the collar. In the picture, the narrow part is the collar stand and the wider part is the actual collar.

Here you can see the collar sewn in place (after sewing the shoulder seam). The corner is tricky to sew and I messed it up in the practice collar I made, but this time I managed to sew it as it's supposed to be.

So this is the progress so far (the back piece is out of the picture). Then it was time to sew the sides seams and sleeve seams and fit the sleeves.

When fitting the sleeves, we found out that my right shoulder is 2 cm lower than the left. I could have ignored that, because all my clothes so far have had identical shoulders and I've never even noticed anything. However, as I had the chance to get the blazer fitted to me, I decided I wanted to fix this. So, I opened the right shoulder seam up to the collar stand seam and raised the shoulder of the back piece by 2 cm.

After fixing the shoulder, I sewed the sleeves place and it was time to move on to the lining of the blazer.

The lining required less parts and I managed to get even less wastage. I save the leftover parts for my doll projects, but in this case, there wasn't anything large enough to be usable even in those.

The lining is fairly easy to sew. You just make another blazer, but wrong side out. You need to leave a 15-20 cm opening in one seam of one sleeve for turning the blazer right side out at a later stage. The white piece showing underneath the lining on the right, is a thin shoulder padding. I don't like how shoulder paddings feel, but having even thin ones gives the shoulders a better shape, so it's a compromise between looks and comfort.


After sewing the cuffs, you turn the blazer wrong side out to sew the hem. Here you can see how to sew it when the bottom of the front edge is rounded.

Then it's time to turn the blazer right side out again. You do this through the opening left in the sleeve lining. After turning the right side out, sew the opening closed.
This pattern had a curious way to make the slit in the back. It took a while to understand what I was supposed to do, but I figured it out eventually. This had to be sewn by hand as there was no other option.

All that was left was making buttonholes and sewing buttons. The picture below shows a machine for making keyhole buttonholes (tailor's buttonholes). They look much neater than basic rectangular ones. You need a bit of practice to get the placement of the buttonholes right with this one, so I had a leftover piece of the pinstripe fabric to make quite a few practice buttonholes before daring to make them in the actual blazer.

You can see the finished blazer in the first picture of this post, but here are pictures of some details.


The placket in the sleeve is a fake one. So there's a placket, but the lining was sewn in place as if there wasn't one and the buttons are sewn all through to keep it closed.

Here you can see the keyhole buttonholes. The buttons are shank buttons made of metal.

Thursday, March 18, 2021
More pockets
After finishing the double pockets, it was time to make some more pockets for the vest. These go above the other pockets.
The first thing was to make a pattern, and I had no idea how to do that, because the pockets needed folds. However, that's what the teachers are for. It turned out to be quite simple, you just need to know what to do. In this case, it was the same thing we did when making the patterns for the bell-shaped skirt.

You make a pattern for a flat pocket, cut it as shown in the picture above, and then spread out the bottom ends of the outer parts a bit. In this case, there is 1 cm added to both corners. Then you glue the pieces in place and draw the seam allowances around the pattern created this way. When sewing, you just make folds that remove 1 cm from both corners, and the result is a pocket with straight vertical sides.
The order of sewing is: sewing and stitching the folds in the corner, hemming the upper edge, ironing the seam allowances in the sides and bottom edge, and stitching the pocket in place. With a single color fabric, you'd use either the hem or front middle to get the pockets straight, but in this case, I used the upper edge of the lower pockets, because the pictures needed to be horizontally straight.

So now the vest has all of the outside pockets. The next step is to make the lining and the inside pocket that will be sewn into it. I'm currently in the middle of making a sample of the inside pocket, because getting the zipper in place properly is a bit tricky. Best to practice first before touching the actual lining.

Saturday, March 13, 2021
Green velvet dress
The next dress made with patterns from a book is a long dress made of green velvet. The book is Rosemarie Ionker's "Fashion Doll Clothing," and the pattern is on pages 97-98. The pattern is for Madame Alexander's Alex, but I was making the dress for the CED doll Colin. That meant more resizing.
I started by resizing the pattern to the best of my abilities. I took the necessary measurements and added length and width as required.

However, I didn't trust my patterns, so I made a prototype of the bodice. I suspected the front might be too wide, which turned out to be the case. As I hadn't sewn the front middle seam, it was easy to pin it to get the bodice to the right size. All I had to do then was to adjust the patterns accordingly.

The lower part of the pattern was easier to resize as it only required adding some length. Thinking of this afterwards, the fabric wasn't the best choice for this design due to the number of panels, but I didn't think of that when I started.

After sewing all the pieces together, the dress was fitting surprisingly well. The patterns I made weren't perfect, but good for a first attempt. Maybe I'll make another dress using more suitable material now that I know what still needs fixing.

I sewed a zipper on the back, because it's the easiest closing mechanism for a dress like this. Here you can see some of the problems I had with the fabric. Fortunately, it's all in the back and out of sight most of the time.

Here's the finished dress after making the sleeves and finishing all the edges. I think it's looks nice enough, and what it especially does is give Colin a more normal body shape. I'm not quite sure what's wrong with her measurements, but she doesn't look very good in narrow skirts.

Here's a closeup of the shoes. I made these over 10 years ago, I think. The color is maybe a bit too light to go with the dress, but at least they're green.

Saturday, December 12, 2020
Easy to make dress for Kindi Kids dolls
I'm not usually interested in little child dolls, but Kindi Kids are quite cute, and their proportions are interesting in the point of view of making clothes and shoes. So I bought one, and I'm going to experiment on some techniques I wouldn't use for items I make for collectible dolls.

The first idea was making a dress using felt. Unfortunately, this turned out to be too big, so I'll need to make the orange and blue parts a bit narrower, adding two more seams, but hopefully this can be salvaged.

The nice thing about the first experiment was that it gave me a good idea on what to change in the pattern. After making the changes, the pattern can be used for making the dress below. It's one piece of fabric, only shoulder seams need sewing, and back needs some sort of a closing mechanism (velcro recommended).

The pattern is available on my web site, so you can download it as a PDF file and make as many dresses as you like. And it's also a good starting point for your own creations as it has the basic measurements and you can make changes as you wish.
Friday, December 11, 2020
Using an old shirt as a pattern for a new one
One of my favorite shirts was coming to the end of its useful life. There was a huge hole in the left sleeve, and I didn't see a way to fix it, so I decided I'd rather use the shirt for making a pattern for a new one.

I cut open all the seams and got confirmation for what I had been suspecting. I always thought the seams were a bit twisted, and folding the front piece in half showed me that it was the case. This meant that I had to make the patterns as halves, so I cut from the fold and kept the wider half, which I cut a bit narrower while straightening the side.

Here are the pieces I used as patterns. The back piece needed straightening as well, because it was just as twisted as the front.

Here are the new front and back. The pattern in the fabric would have been very hard to align at the edges, so I just made sure they were aligned vertically, that is, the colors matched at the seams.

I even matched the colors in the sleeves. I could have saved some fabric by not doing this, but I wanted the sleeves to be identical. I have seen shirts on sale for which this has not been done, and I think it's just lazy (unless it's part of the design).

I'm not good at getting the sleeves right, so I decided to assemble the shirt in slightly wrong order. After sewing the pieces together as shown in the photo below, I sewed all the side seams. I sewed them from the arm pit to wrist and arm pit to waist, so it was four seams. At least the arm pit seams are extra strong as the seams overlap there for a bit.

My sewing machine is Pfaff Passport 3.0 and has the following stitches. I used number 15 for combining the pieces and number 12 for all the edges where the fabric was folded.

Here is the finished shirt. It's the right size and feels very comfortable, so I'd say it's a success. And now I have the patterns for making more of these, if I want (if I happen to find some nice fabric I want to make into a shirt).

Saturday, October 1, 2011
Overview of past 6 months or so
I haven't been posting anything here, but I haven't been entirely idle. There are photos on my Flickr account on stuff I've been making during my absence and I thought I could post an overview here.
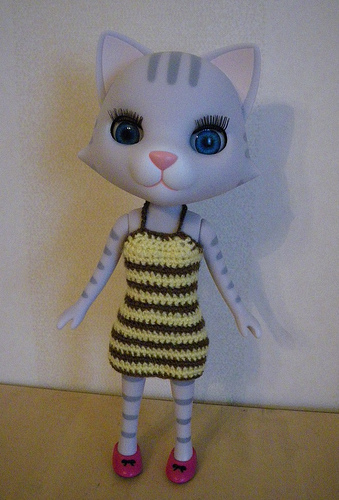
Bobo and Nikki got some crocheted dresses:


I got Robert Tonner's 11" Miss Piggy and made some clothes for her. You can find the patterns for these on my website.


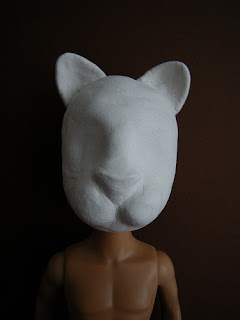
I am also in the process of customizing a Bratz Boyz doll. He will become a feline and has already had his hands and head replaced, although the head is not ready yet.

And finally, I've been making some 1/6 scale furniture, for example, a chair for Monster High dolls.


Bobo and Nikki got some crocheted dresses:




I got Robert Tonner's 11" Miss Piggy and made some clothes for her. You can find the patterns for these on my website.


I am also in the process of customizing a Bratz Boyz doll. He will become a feline and has already had his hands and head replaced, although the head is not ready yet.


And finally, I've been making some 1/6 scale furniture, for example, a chair for Monster High dolls.


Subscribe to:
Posts (Atom)
