Tuesday, December 4, 2012

1/6 scale wingback chair

Usually I make doll chairs using a pre-existing structure, such as a plastic bottle, cut to shape and then covered with felt and fabric. This time, however, I wanted to try a proper chair.

I started by designing the required parts. That's actually quite easy as only the sides need actual designing, the rest are just rectangulars, and the biggest challenge is in getting the length and width right. 

I cut the parts from cardboard (fairly thick, I think it came as a backing for mailed comics) and covered the insides with two layers of felt (glued in a few places to keep it in place). Note that I left some edges clear, those are the areas used for gluing the parts together.


Then I covered the pieces with wool fabric. I usually use thinner fabrics, but this suited the style of the chair best.


Here the parts are glued together to make the basic form. You can also see how the edges of fabric were cut into flaps and glued to the other side of the cardboard.


Next, I made the back piece, which is one continuous piece covering the sides and back of the chair. The cardboard pieces are actually a bit longer than the ones for the inside part for a reason I will explain later. I glued the cardboard pieces to the felt, leaving small gaps where they need to form 90 degree angles.


Next,I covered the outside of the back piece with a piece of the same wool fabric. I also glued some of that fabric to the bare parts of the already constructed "inner chair". That was to make a more even surface for gluing the back in place.


Then the back just needed to be glued in place. Here you can see why the outer pieces were longer. Once you make a rectangular piece to close the gap that will be left under the front edge of the seat, the seat will look thicker and the chair will look more authentic.


Here is a picture of the finished chair, with a doll to show the size. The legs of the chair are just round pegs cut to length, glued in place and painted brown.

Sunday, September 2, 2012

Bee

The first Create a Monster set I bought only had one torso, so I decided to make one myself. I had already ordered a couple of the expansion sets, so I decided to make the torso for the bee and paint the upper arms and legs with the correct color. The grey head is here just for reference.

The armature is made of wood and the black and yellow torso is needle felted.


This photo shows the doll before painting and also in comparison to a normal Monster High doll.


I made the stand, in which the upper legs are attached, for painting doll shoes, but as the wooden posts are made of the same round strip as the part of the torso where the legs attach, the stand was perfect also for painting the upper legs.


I used FolkArt's acrylic paint "509 Sunny Yellow" and it was a bit too yellow compared to the lower leg. I painted several coats with it and then mixed the color for the final coat by mixing Sunny Yellow and "480 Titanium White." Finally, I applied a coat of matte sealer to prevent the paint from chipping.


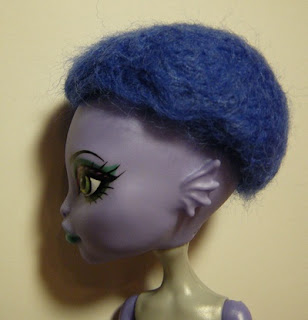
This was just going to be a needle felted wig cap, but I liked how it looks, so I left it as it is and will make another wig using the original plan.


Here is Bee almost finished. I'm still thinking of giving her a stinger, but I'll need to figure out how to make one. I tried using wood, but the result wasn't satisfactory, so I'll continue experimenting.


Friday, August 24, 2012

Needle felted wig for a Monster High doll

I decided to try needle felting to make a wig for a Monster High Create A Monster doll. I started by making a wig cap that would be the basis for an updo. The photos below show it from different sides.


The wig cap kept slipping off or into wrong position, so a peg for keeping it in place was necessary. I used a strip from a 0.3 mm thick metal sheet.


As glue wouldn't have kept the metal strip in place, I cut a small piece of felt, made a hole in it and pushed the peg through.


Then I put the peg in place, spread glue to the felt, put the wig cap in place and pressed it down to the head to make the peg construction stick inside it.


Here is the inside of the finished wig cap.


Then I attached the actual hair inside the edges of the wig cap. I used coarser wool for the wig cap and mohair for the actual hair.


This looked funny and I can imagine all sorts of funny hairdos you could make this way.


However, this one was about to become a very formal updo. I collected the hair and attached it to the top of the head. Then I made the bun and attached its bottom to the top of the head as well. The hairline of this wig is maybe a bit too high, but it's good enough for a first try (and my second needle felting project ever).


Crocheting

I really prefer the way knitted items look, but crocheting is so much easier. Here is a crocheted dress I made for a Rini doll.


The hem is made using the stitches seen in the video below.


The upper part is made using the stitches shown in the next video.

Thursday, August 23, 2012

Knitting

It's been a long time since the last post. Here is a compilation of some knitted doll clothes I have made recently. First, something for the smaller Miss Piggy.


Next, Monster High dresses from similar yarn as Miss Piggy's dress.


Then I tried some dresses with short sleeves.


A dress for Jessica Rabbit, made with just one ball of yarn that had alternating colors.


Here is a group picture of dolls wearing knitted dresses made of the same brand of yarn (Novita puro) in different colors.


Finally, an experiment in making a knitted jump suit. It's better than my first try, but the pattern still requires some modifications.