Monday, September 16, 2019

Update

This blog may have been neglected for a long time, but I'm still here, just not keeping up with a lot of things. Health issues have forced me to think carefully how I use the energy I have. Of course work comes first, and after that, there isn't huge amounts of energy left, so the blogs and my YouTube channel have been dormant for years.

Currently, I'm mostly active in Instagram (@dollphotostories), but I have also been writing a book that is connected to the "6th Scale Story" photo stories on my web site (dolls.fennotrans.fi). It will be a standalone story available as a short novel in the Amazon Kindle Store in October 2019. To keep up on the progress of the book and to get info on offers (I plan to make it free for the first few days after publication), follow me in Instagram.


Friday, October 17, 2014

Bastet

I haven't been making any miniatures lately, but I did rewire Bastet as the old lights under the floor stopped working. Here are two videos, first about the rewiring and the second about furnishing the bar.


Friday, February 28, 2014

Metal tunic for Monster High CAM doll

I've been making just doll shoes lately, but last night I decided to try this new material I bought at the Dollhouse Fair last week. It's made of metal, but behaves more like fabric.


You can see the structure in this closeup of the reverse side. There are two kinds of metal pieces: rings and pronged plates that are connected to each other using the rings. The way to "cut" this material is to open the prongs to separate pieces.


My first experiment with this material is a tunic for a Monster High "Create A Monster" doll. The reason it only works for these dolls is that in order to put the tunic on the doll you need to remove the head and arms.

I had a 10 cm x 10 cm piece of the material. I connected some pieces on opposite edges to create a side seam. Then I opened the top and bottom on the other side to create an opening for the arm and a side slit. Finally, I connected some pieces on both shoulders.


Here you can see the slit on the side. It was necessary, because the piece was not wide enough to go all the way around the hips. The doll really needs something under this, either a skirt or tight-fitting trousers.


Friday, October 4, 2013

1/6 scale cabinet with lights

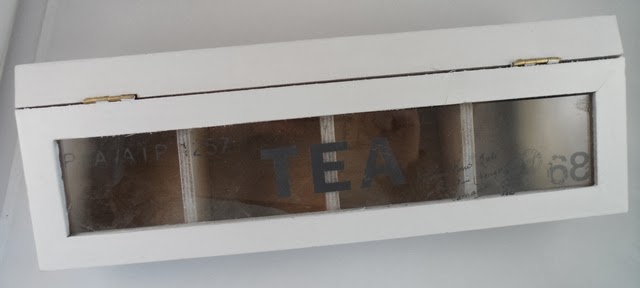
I got this tea box for converting it into a 1/6 scale cabinet. The first task was to remove the painted text from the glass.


Acetone worked well for that and removed all traces of paint.


Then I painted the box inside and out. I covered the glass with masking tape during the painting stage, although any extra paint would have been easy to remove with acetone.


Then I got the idea of installing lights to the cabinet. I made holes for the lights on the side of the cabinet and used wooden strips painted to the same color as the outside of the cabinet to hide the light installation. The lights are in a chain of 10 battery operated LED lights. There are two lights per shelf and the two extra ones are attached at the back of the cabinet for now. I will probably build some sort of decorative display on top of the cabinet and use those lights in it.


Monday, August 19, 2013

Printables

Here are some newer 1/6 scale printables I have made. There are more in an earlier blog post. These first ones are some of my books and magazines that I scanned and resized. The two bigger books have some inside pages as well, but the rest have just blank pages inside as a filler.


I scanned, resized and printed some chocolate bar covers. The inside is a piece of cardboard and the gold wrapping is from the actual chocolate bar.


Here are some finished ones. I made these for a 1/6 scale shop set I used in shooting a photo story.


These are in 1/12 scale and I bought them as printed sheets and assembled them myself. I filled the packages with some decorative sand to make them sturdier.


Friday, August 16, 2013

Monster High mugs in 1/6 scale

When I made the heels for Monster High shoes using wooden cigarette holders, I was left with pieces of round wooden tubes and wondered what I could do with those. I decided to use them to make mugs for 1/6 scale sets. The heart-shaped plastic decorations are for making the handles.


Here are the tubes sawn into suitable length and the plastic pieces cut to shape.


Then I glued the handles in place, glued cardboard to the bottom of the mugs, and painted everything with white acrylic paint.


I found these small Monster High stickers the other day and thought they would be perfect for this purpose.


I applied one coat of glossy sealer, let dry, attached the stickers, and applied two more coats of sealer to get really glossy surface.


Thursday, August 15, 2013

1/6 scale bar furniture

I have been making a 1/6 scale bar set in my bookshelf. I had a bar desk made of cardboard, but I wanted to have proper furniture for the new set.

First, here is the bar desk made mostly of balsa wood. The first photo shows it upside down before attaching the legs, so you can see the basic structure.


Then I added legs. The wooden strip in the front edge made the desk front heavy, so the front legs had to be attached right behind the strip.


Here is the finished desk painted with acrylic paint and the top has scrapbooking paper attached to it, because balsa wood was too soft for the top. The final stage was applying sealer all over.


The next piece is a small table with a tap and sink and it will be behind the desk, against the side wall. The table top is a piece of cardboard with wooden strips around it and a hole for the sink. The sink is from a package of 4 AA batteries.


Here is the same seen from below. I glued some pieces of wood and cardboard for support.


All the wooden parts are painted with acrylic paint, but for the sink, I used Revell paint meant for painting plastic scale models. The pipes are made of wood, except for the "S" piece, which is made of modeling clay. The white strips are made of cardstock and help to keep the pipes in place.


Here is a view from above. I made a hole in the bottom of the sink and carved a little hole in the "S" pipe. Then I painted the parts visible through the hole black.


The final step was to make a tap and attach it to the top, making sure it matches the location of the pipe underneath. The tap is made of modeling clay. I first made the curved part and baked it alone. Then I made the bottom part around it and baked the two pieces together. I made the hot and cold water taps separately, baked them and then glued them in place. Then I painted the assembled tap white using acrylic paint. Finally, I used a hole puncher to cut red and blue round pieces of paper and glued them on the taps. As the paint was matte finish, I applied sealer to get more dirt-resistant surface.


The third piece is a shelf for bottles and other items needed in a bar. This is a very simple structure made with wooden cigarette holders and pieces of cardboard. The first photo shows the upper and lower pieces after assembling them separately.


Here is the finished shelf in its place in the set. It only needed two coats of paint and one coat of sealer after assembly.