Thursday, November 19, 2020

I'm back after a long break

I have been neglecting everything else online except Instagram, but I thought I might start posting my projects here again. The difference between the current ones and the previous ones is that I'm currently not doing miniature stuff, but clothes and other sewing for myself.

This post is a collection of some alteration/mending, which started my current projects. I haven't had much work this year and didn't get much done before summer due to severe lack of motivation (caused by the depressing work situation). However, when I had a duvet cover that was too frayed on the edges and decided to turn it into a couple of pillow covers, I suddenly found motivation to do some other sewing as well, and now I have several unfinished projects going on.

Let's start with the pillow covers. The duvet cover had a picture of Garfield ready to go to bed. I decided to use his face for the pillow covers.


The next project was mending a cardigan that had a hole in the elbow. I got it used from my aunt and it's made in China, so it's not like it's valuable, I just thought it might be a good idea to try mending it. I learned this sort of mending at school (5th or 6th grade), but haven't needed the skill for years (maybe decades), so I had to do some Internet searches to refresh my memory. The result is not a square as it should be, but it's good enough for me.


Discussing the mending with an online friend led me to sashiko, visible mending. Of course I had to try that as well. I had been mending some jeans just using a zigzag stitch to attach a piece of fabric under the part that was too worn. Visible mending turned out to be much more fun. I have only used it for two pairs of jeans for now, but probably will use it more later, experimenting with different kind of stitches.


The last one for this post is replacing the zipper in a winter jacket. The original zipper was of poor quality and had been causing trouble since I bought the jacket. So I bought a sturdy zipper in a nicer color and replaced it. This was the first time ever I did something like this, but the result looks quite nice.


I have made some alterations and totally new items after these, so those will be described in future posts. I'll try to post once a project is ready, so I'll get all the different stages in one post.

Tuesday, October 29, 2019

Halloween special


I have been transforming some of the photo stories on my web site into ebooks, which are available for free on the same web site (dolls.fennotrans.fi). You can read the books with a reader compatible with .mobi files, such as the Kindle app. (To download it for free, go to the Kindle app download page.)

In addition to the Mad Hatter story, there are six free ebooks collecting the 6th Scale Stories for offline reading.

Saturday, October 12, 2019

The Feline Clause is available now

The book is out for Kindle now and will be free for the first five days. starting from October 13th, 12 AM PDT. Just click the picture to go to the Amazon Kindle Store to download it. And if you don't have a Kindle device, the Kindle app is free and lets you read any Kindle books. You can download it from the Kindle app download page.


There will be a special offer on the doll shoe books (both English and Finnish versions) in amazon.com, running for the same time as the offer above. (For amazon.co.uk buyers only the English version will be on offer.)


If you're here too late for the launch offer, the Look Inside option on the store page will let you read the entire first chapter and a bit of the second one, so you can check, if the story interests you. If it does, you can always try Kindle Unlimited for free for a month. The Feline Clause will be in KDP Select for the first 90 days and will also be available in Kindle Unlimited for that same time. Click the link below to check the offer.

Kindle Unlimited Membership Plans

Monday, September 16, 2019

Update

This blog may have been neglected for a long time, but I'm still here, just not keeping up with a lot of things. Health issues have forced me to think carefully how I use the energy I have. Of course work comes first, and after that, there isn't huge amounts of energy left, so the blogs and my YouTube channel have been dormant for years.

Currently, I'm mostly active in Instagram (@dollphotostories), but I have also been writing a book that is connected to the "6th Scale Story" photo stories on my web site (dolls.fennotrans.fi). It will be a standalone story available as a short novel in the Amazon Kindle Store in October 2019. To keep up on the progress of the book and to get info on offers (I plan to make it free for the first few days after publication), follow me in Instagram.


Friday, October 17, 2014

Bastet

I haven't been making any miniatures lately, but I did rewire Bastet as the old lights under the floor stopped working. Here are two videos, first about the rewiring and the second about furnishing the bar.


Friday, February 28, 2014

Metal tunic for Monster High CAM doll

I've been making just doll shoes lately, but last night I decided to try this new material I bought at the Dollhouse Fair last week. It's made of metal, but behaves more like fabric.


You can see the structure in this closeup of the reverse side. There are two kinds of metal pieces: rings and pronged plates that are connected to each other using the rings. The way to "cut" this material is to open the prongs to separate pieces.


My first experiment with this material is a tunic for a Monster High "Create A Monster" doll. The reason it only works for these dolls is that in order to put the tunic on the doll you need to remove the head and arms.

I had a 10 cm x 10 cm piece of the material. I connected some pieces on opposite edges to create a side seam. Then I opened the top and bottom on the other side to create an opening for the arm and a side slit. Finally, I connected some pieces on both shoulders.


Here you can see the slit on the side. It was necessary, because the piece was not wide enough to go all the way around the hips. The doll really needs something under this, either a skirt or tight-fitting trousers.


Friday, October 4, 2013

1/6 scale cabinet with lights

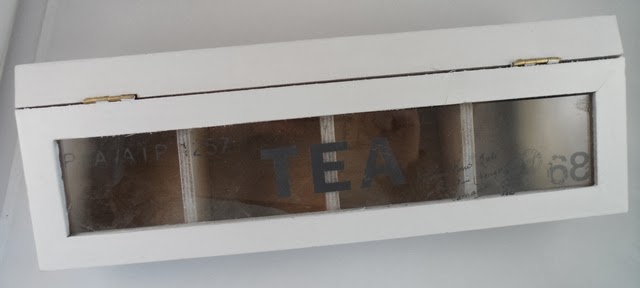
I got this tea box for converting it into a 1/6 scale cabinet. The first task was to remove the painted text from the glass.


Acetone worked well for that and removed all traces of paint.


Then I painted the box inside and out. I covered the glass with masking tape during the painting stage, although any extra paint would have been easy to remove with acetone.


Then I got the idea of installing lights to the cabinet. I made holes for the lights on the side of the cabinet and used wooden strips painted to the same color as the outside of the cabinet to hide the light installation. The lights are in a chain of 10 battery operated LED lights. There are two lights per shelf and the two extra ones are attached at the back of the cabinet for now. I will probably build some sort of decorative display on top of the cabinet and use those lights in it.