


I made a cloth doll based on Joakim Broden of Sabaton. Here's the video about it:
Showing posts with label custom doll. Show all posts
Showing posts with label custom doll. Show all posts
Saturday, November 6, 2021
Sunday, September 2, 2012
Bee
The first Create a Monster set I bought only had one torso, so I decided to make one myself. I had already ordered a couple of the expansion sets, so I decided to make the torso for the bee and paint the upper arms and legs with the correct color. The grey head is here just for reference.
The armature is made of wood and the black and yellow torso is needle felted.

This photo shows the doll before painting and also in comparison to a normal Monster High doll.

I made the stand, in which the upper legs are attached, for painting doll shoes, but as the wooden posts are made of the same round strip as the part of the torso where the legs attach, the stand was perfect also for painting the upper legs.

I used FolkArt's acrylic paint "509 Sunny Yellow" and it was a bit too yellow compared to the lower leg. I painted several coats with it and then mixed the color for the final coat by mixing Sunny Yellow and "480 Titanium White." Finally, I applied a coat of matte sealer to prevent the paint from chipping.

This was just going to be a needle felted wig cap, but I liked how it looks, so I left it as it is and will make another wig using the original plan.

Here is Bee almost finished. I'm still thinking of giving her a stinger, but I'll need to figure out how to make one. I tried using wood, but the result wasn't satisfactory, so I'll continue experimenting.

Wednesday, November 9, 2011
Greyscale Ghoulia
I wasn't quite sure what to expect as I started removing the head from a Monster High Ghoulia doll. I did it with that small screwdriver you can see in the photo. The construction turned out to be similar to Barbie's. The only reason for that odd round knob seems to be that Monster High dolls have such a thin neck that the post could not be attached to it without making that part thicker.

Next, it was time for the hair to go. I cut the hair as short as possible and then used the wide tweezers to scrape the inside of the scalp to pull the hair in. When everything was inside the head, I used the other tweezers to pull it all out (those tweezers are easier to use as you press to open them, so their "default position" is closed).

After removing all original paint using acetone, it was time to apply some new. I used Folk Art's acrylic paints and mixed the different shades myself.


I had thought that I would do a reroot, but I came across the perfect yarn for her hair and it was too thick for rerooting (or at least I couldn't figure out how it could be done). So, I used a sewing machine to sew the strands together for easy gluing. It's fairly easy when you arrange the strands on top of baking paper and sew at least twice across them. When finished, you just need to rip off the paper (by this time, it will have so many holes in it that it will be easy to remove).

I used three strips: back, front, top. The top one is sewn from the middle to make a parting. I used PVA glue to glue the hair in place as it has worked with a smaller doll I customized earlier. If it won't hold, I'll use super glue to glue it back. Even if I have to resort to that, the first gluing won't be a waste of time as I expect super glue to work better when there will be a smooth surface (the PVA glue strip in the hair) against a smooth surface (the vinyl).

And here Ghoulia impersonates Cousin Itt as she waits for the glue to dry.

Finally, photos of the finished doll. She's wearing a business suit for now as I haven't yet made her outfit. The boots are the ones I made for Draculaura a while ago.


Tuesday, November 8, 2011
Small custom doll
As I've got two basic Draculauras, I also had a duplicate of Count Fabulous. I decided to try some customizing on him.
The first thing to do was to cut off the head and wings and to find a suitable donor body. I don't remember what kind of a head that doll originally had, but it was some kind of a fairy.
The picture shows the parts and the tool used for making a hole for the neck post. Here the wings are glued together with super glue, but that didn't hold, so I had to find another solution.

Front view with head and wings in place.

Back view with head and wings in place. I used hot glue for the wings and that made a bump on the back, but at least it held the wings in place.

First coat of black paint applied. This was easy as black is black and the usual problem of finding the right shade could be avoided. The feet are not yet painted as I needed some place to hold the doll while painting.

After a couple of coats of black paint, pink on the clothes, and satin sealer to protect it all, the doll was finished. She's shown here with the first Count Fabulous. I only noticed at this point that their eyes are different for some reason.

Saturday, October 1, 2011
Overview of past 6 months or so
I haven't been posting anything here, but I haven't been entirely idle. There are photos on my Flickr account on stuff I've been making during my absence and I thought I could post an overview here.
Bobo and Nikki got some crocheted dresses:


I got Robert Tonner's 11" Miss Piggy and made some clothes for her. You can find the patterns for these on my website.


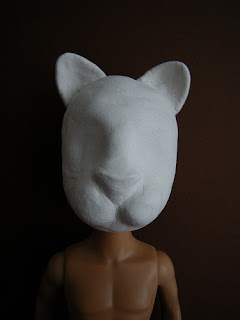
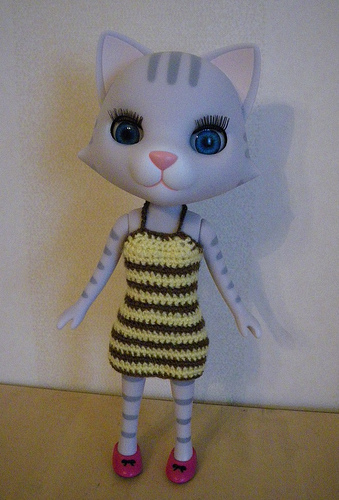
I am also in the process of customizing a Bratz Boyz doll. He will become a feline and has already had his hands and head replaced, although the head is not ready yet.

And finally, I've been making some 1/6 scale furniture, for example, a chair for Monster High dolls.


Bobo and Nikki got some crocheted dresses:


I got Robert Tonner's 11" Miss Piggy and made some clothes for her. You can find the patterns for these on my website.


I am also in the process of customizing a Bratz Boyz doll. He will become a feline and has already had his hands and head replaced, although the head is not ready yet.


And finally, I've been making some 1/6 scale furniture, for example, a chair for Monster High dolls.


Friday, June 18, 2010
Custom Kitty reroot
This was originally Toffee, the yellow kitty with yellow hair. I painted her all white and then painted the siamese cat markings. The body isn't quite finished yet, so here is just the head, which I finished today. It's my first reroot, so I used yarn to make things a bit easier. As there was not enough yarn of the same color, I used three different shades of white.

The top of the head got a bit torn when I removed the original hair as the holes were so close to each other. I fixed that problem by applying several coats of paint on the holes and applying a generous amount of sealer on top of it. The sealer helps to keep the paint from cracking too badly during rerooting, although there was one small crack. It would probably be even better to put sealer first in the holes, then paint and then more sealer.

The top of the head got a bit torn when I removed the original hair as the holes were so close to each other. I fixed that problem by applying several coats of paint on the holes and applying a generous amount of sealer on top of it. The sealer helps to keep the paint from cracking too badly during rerooting, although there was one small crack. It would probably be even better to put sealer first in the holes, then paint and then more sealer.
Monday, December 28, 2009
Custom Catwalk Kitty Chase
Customizing Petite Catwalk Kitties is fun. Here is what I did with a Chase doll. First, I opened her hair and there sure was a lot of it.

Then she got some temporary tattoos, which I covered with satin sealer to prevent damage to them. I painted her top, because it would have been hard to make a fabric top that would not have covered the tattoo on her back. She also got an eyebrow ring, which is piece of gold plated metal wire bent to shape and pushed through the vinyl (first I made a hole with a needle). At this point, I had cut the hair a little shorter to make it easier to handle her, but final haircut was not decided yet.


She originally had green shoes, but as I had an Anika doll I was going to customize too, I swapped their feet and Chase got boots. They were originally white, but I painted them black, added some glitter to the flower patterns on the boots and covered everything with sealer.

And here she is finished. The skirt is made of black leather and the jewelry from thin copper sheet. I decided to cut her hair fairly short and I think it turned out very nice.

Subscribe to:
Posts (Atom)
