The shirt for Baha Cat's folk costume is not made of right kind of fabric, but it looks good enough for the purpose. The pieces are all rectangles, with seams on the shoulders and sleeves.
 I was going to sew the cuffs and collar in place, but as the fabric was a bit stretchy, I thought fabric glue would be a better choice. It does look neater this way. The opening on the back is closed with two snaps and the cuffs are closed with one snap each. Actually, there should be buttons, but for this small scale, I'm content with this solution.
 Related earlier posts:
Baha Cat's vest and stuff for Brother Dreary
Hat for the Baha Cat
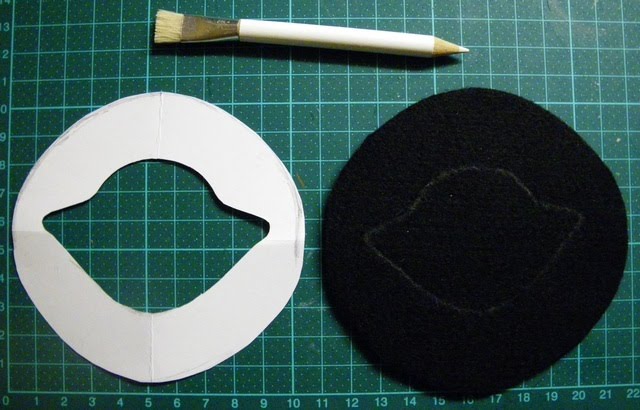
Shoes for the Baha Cat's costume
Helavyö
Brother Dreary's sweater is finished now. It is a bit tricky to get on the doll, because of the yarns on the back of the pattern, especially in the sleeves. However, this is a traditional model that has fairly narrow sleeves, so I couldn't make them any wider.
Related earlier posts:
Brother Dreary project
Baha Cat's vest and stuff for Brother Dreary
The most problematic part of the folk costume is the belt, called "helavyö." It consists of a leather belt adorned with metal pieces. I've got a choker I can use for Brother Dreary's belt, but the belt for the Baha Cat needed to be made from scratch.
The dangling metal pieces in the belt are not actually hearts, but more like leaves, but as I only had a heart shaped hole puncher, this belt was going to have heart shaped pieces. The metal sheet in the picture is relief foil (meant for making embossed pictures).
 Next, I glued pieces of metal wire to the back of the hearts. The square parts are made of two layers of cardboard glued together. It would have been much too difficult to actually make tiny buckles, so I decided to simplify things quite a bit.
 Then I painted the squares. Gold color on the edges and the belt color in the middle.
 I made holes in the bottom edge of the squares and attached the hearts using the metal wires. I thought of gluing also the other end of the wire in place, but decided not to. I will do that, if the pieces start getting caught in the fabric or yarn of the doll's clothes.
 Finally, I glued the squares to a strip of red leather and made a buckle using the same foil I used for the hearts. The buckle is much simpler than what is used in real belts, but the mechanism should be correct.
 Related earlier posts:
Brother Dreary project
Socks and the beginning of the vest
Parts of the vest
Baha Cat's vest and stuff for Brother Dreary
Sewing the large vest
Hat for the Baha Cat
Shoes for the Baha Cat's costume
I finished the larger version of Max. The main part that was missing were the hands. I made them from Cernit modeling clay. The picture below shows the hands after baking, but before painting. I had to paint them as the white was wrong shade. I had painted the head with titanium white, so the hands had to be the same shade, not the slightly translucent cream color of the modeling clay.

The next photo shows how the head will stay in place. First I thought I wouldn't glue the head in place, although the metal pipe is glued to the body, but the head is fairly heavy and if it fell, it would probably break (or at least the ears would), so I decided that glue would be safer.
I'm using PVA glue for everything else, but for the hands, I used hot glue. The hands turned out to be a bit too big and I noticed that already before baking them, but they were so good that I didn't want to spoil everything by trying to make them smaller. This large version isn't exactly like small Max in any case, so some differences in proportions won't matter.
Finally, here is the finished figure with large Schizo and the mini figures for both.
Related earlier posts:
Maxi Max
Body for Max
I started sewing the vest for Brother Dreary. The picture below shows how to sew the card-woven bands together. The thread goes from left to right and back between the threads of the first and second card, always going forward and never going over the edges of the bands.
 The two bands in the part where the lapel was going to be caused a bit of a problem. As the lapels are turned, the side where the edges of the band are visible needs to be changed at a point where the change will remain invisible. I started from the upper edge with edges of the band on the outside, sewed a little bit to make it easier to turn the lapel, and checked where the change should be made.
 The next picture makes things a bit clearer. The point of change mentioned above is visible on the side that will be the inside of the vest and under the lapel on the outside. This way, everything that is visible stays neat. The inside of the vest and the parts under the lapels won't show, so they don't matter.
 I also had to try making socks for the Baha Cat, although I had already deemed the idea mad. It wasn't easy, but I managed to do it. Of course this is just the first one, I still need to make the other.
 As you can see, the sock doesn't have a proper heel. I just made the decreases on one side only to give it this wedge shape.
 Related earlier posts:
Brother Dreary project
Socks and the beginning of the vest
Parts of the vest
Baha Cat's vest and stuff for Brother Dreary
I made the first band too short, so I had to make another one to get enough material for the vest. When the bands were ready, it was time to measure and cut the needed pieces. First, I measured the required length and applied Fray Stay to the uncut band (on both sides of the place where it was to be cut). When the band was dry again, I cut the band in the middle of the treated parts. In the picture below, you can see two parts of a band treated with Fray Stay. The places where it was later cut are marked with black lines.
 The parts where the direction of turning the cards was changed (to remove twist in the threads) cannot be used for something like this. Because of that, it is a good idea to plan beforehand and place the reversals so that you can cut the band there. All it requires is that you know the lengths of the required pieces and measure the band as you proceed.
For example, I needed one 6 cm piece, one 12 cm piece and two 10 cm pieces for one side of the vest front. I started by making the 12 cm piece turning the cards forward, then I made a little over 20 cm turning the cards backward (removing the twist created earlier and adding some new in different direction), and then 6 cm turning forward (again removing some twist). Even using this method, I had to open the far end of the setup once to remove twist.
I used Fray Stay for this as it is much better for the purpose than Fray Stop. Fray Stop is really glue and looks and behaves a lot like PVA glue. It's thick and remains visible, unless you dilute it heavily with water. Fray Stay is a bit thicker than water, but still leaves an even surface and is almost invisible when it's dry. (Fray Check looks similar to Fray Stay, clear liquid in a bottle with fine tip.)
 The picture below shows all the pieces of the vest front, except the collar pieces, which I haven't cut yet. These need to be hand sewn together and pressed. I'm planning to practice that with the leftover pieces of the band, which I'm going to use to make a vest for the Baha Cat. I want everything I make for Brother Dreary to be as perfect as possible, so I'll try stuff in a smaller scale with the Baha Cat and it may end up having the same kind of costume.
The mail delivered today my order from Little Trimmings. Unfortunately, the buckles I ordered were much too small for this purpose, but they are still very nice and I can use them for some other doll's shoes. Here they are shown with a buckle that's too big. I really need to find something in between these sizes.
 I had much better luck with buttons. The ones on the left are those I ordered earlier and plan to use for the vest (the yellow ones). The gold colored are from Little Trimmings and they are perfect for the jacket.
 I also ordered some fabrics and simple white buttons for Brother Dreary's shirt. There are enough buttons for two shirts as I ordered two sets of 10 buttons, so I'm planning to make a shirt using that tartan patterned fabric. I still need to find suitable white fabric for the shirt to go with the folk costume. I'm not striving for strict accuracy, but I still prefer using fabric that has the right kind of look and feel.
 Related earlier posts:
Brother Dreary project
Socks and the beginning of the vest
I have only knitted one pair of socks before this, about 30 years ago at school. Those took a long time and I was never tempted to try to knit another pair. However, as I am making a sweater for Brother Dreary, I thought I could try socks as well. I searched for instructions for regular size socks and then scaled them down. The first sock has progressed this far:
 The heel doesn't look very pretty, but the shape is correct. The rest should be easy, just a bit more as it is and then decreasing steadily. The part I don't like much is that I need to make the other sock as well, although it will be a lot easier as I wrote down how I made this one.
I also started making the vest for the folk costume. The first thing to do was to set up the threads for card weaving.
 The next picture shows the pattern more clearly. The problem is, I'm not sure the pattern I made is correct. I saw a picture in a book at the library and this is what the pattern looked to me, but it was very small and I can't be sure I got it right. However, it is good enough for the first version. I may end up making a better vest later as I am not quite happy with the shade of brown I'm using. It should be darker, I think, but as I got this shade now, I thought I might as well use it.
 The thread turned out to be excellent for card weaving, much better than ordinary sewing thread. I think I'll order more of it, if I decide to order a better shade for the vest. I might do that as there's quite enough of the red thread for making another vest.
Here is the chart for the setup. I used alternating threading as I thought that would be best for this pattern.

I realized I hadn't added these here. I needed a classroom setup for my photo story, so I had to make some desks and chairs. The table tops are made of pieces of cork left over from other projects and the vertical parts are made of wooden cigarette holders.
Here are the unfinished desks and chairs:
The wooden cigarette holders belonged to my uncle and my father saved them for me when cleaning the house after my uncle passed away.
Here are the finished pieces in the classroom set, which is just a temporary one, set up inside a painted plastic container.
As I still had a lot of small pictures printed on an iron-on transfer sheet, I decided to make some doll clothes using them. The best way to iron a picture on the fabric is to cut the piece first, because then it is easy to get the placement right. Here is a small top with a picture ironed on.
 Here is a shirt with the picture ironed on and some of the seams sewn. This is for a Monster High doll and the pattern is included in the full set.
 Here are the dolls wearing their new clothes. The pattern for Nikki's dress is available on my web site.
I also got thinner yarn from the crafts fair, so I was able to knit a better version of the Jussipaita. The first version of this pattern was for a 1/6 scale doll (see the earlier blog post), but this yarn was much more in scale.
The yarn is 70% wool, 30% silk, and meant for 1.5-2 mm knitting needles. I used 1.6 mm needles. I knitted all three parts as a tube all the way to the red upper part as the pattern was much easier to knit that way. The back has an opening, which closes with a wooden button.