


This video is in two parts as it took quite a long time to explain everything. Making a backpack is not that difficult, but it is time consuming and involves many steps.
Showing posts with label felt. Show all posts
Showing posts with label felt. Show all posts
Wednesday, January 19, 2022
Sunday, March 7, 2021
Leather armor, part 1
Ever since I got this Eowyn's helmet and found out it fits Tyler dolls, I've been thinking of making an entire outfit for the doll to go with the helmet.

The plan has been on hold for a long time, but today I started planning some leather armor. First I made a paper pattern by wrapping paper around the doll and forming the required shape, then cutting that into patterns.

The next step was to make a prototype. I started with fabric. I had to add seam allowances to the patterns for this. The actual patterns won't have them as the edges of the leather will go side by side, not overlapping any.

This bodice turned out to be too big. Fine for a dress, not so for armor. I'll probably make a dress using this at some point, but now I'm interested in making armor.

I reduced the patterns a bit and also got rid of most of the curves in favor of straight lines. I made the second prototype out of thick felt as I wanted material that would be approximately the same stiffness as the leather I'm going to use. Below are the parts of the bodice. I decided to cut the back piece into two separate pieces as there needs to be slight curve there.

This is the felt bodice and it's the correct size considering that there will be some clothes under it. The lower part of the armor will be strips of leather sewn to the lower edge of the bodice. I'm also planning on adding some shoulder and upper arm pieces, but those can be planned later. First I'm going to make the basic piece and additional parts will be easier to plan when I've got that.

I now have working patterns for the bodice, so the next step will be to make it out of leather. I remember doing some leather decorating as a kid, so I'll need to look into that, because it would be nice to have decorated armor instead of one of plain leather.
I haven't thought about the details of the clothes that go underneath the armor, but it'll be at least a shirt and trousers. I've made some repros of historical clothing, so the designs won't be a problem. Some sort of boots are also needed, but I'll need to do a bit of research on that, because I'd like to be a bit more accurate about them.
Thursday, December 24, 2020
New headband for the Kindi Kids doll
As I seem to be making an entire outfit for the doll, I thought I might as well make a new headband for her too. I used the original to draw a paper pattern and then cut the piece out of a metal sheet (0.3 mm thick).

Cutting the metal was easy with these shears. I've been wondering about the manufacturer as there are no markings in these. Did a Google search and found a picture of similar shears, but no info on who makes these. However, the picture was from ebay, so I found out that these sell for about 10 €. I don't remember what I paid as it was over 15 years ago.

I bent the metal piece using the original headband as a guide.

Then I covered the upper surface of the metal piece with felt using hot glue.

The next stage was cutting a piece of felt that would cover the inside and gluing it in place.

I glued some ribbon on the upper surface using again hot glue.

The final stage was gluing one of these paper flowers to the headband.

The text in the package sounds really good, but I'm a bit skeptical. I tried finding verification for this, but all searches only found online stores selling this stuff. You'd think that they would make a big deal out of the story, if it's legit, so I still have my doubts.

Here is a picture of the finished headband on the doll. Metal should keep its shape fairly well, and gluing the felt onto it when it has been bent should also add some tension that'll help to keep the shape.

Tuesday, December 4, 2012
1/6 scale wingback chair
Usually I make doll chairs using a pre-existing structure, such as a plastic bottle, cut to shape and then covered with felt and fabric. This time, however, I wanted to try a proper chair.
I started by designing the required parts. That's actually quite easy as only the sides need actual designing, the rest are just rectangulars, and the biggest challenge is in getting the length and width right.
I cut the parts from cardboard (fairly thick, I think it came as a backing for mailed comics) and covered the insides with two layers of felt (glued in a few places to keep it in place). Note that I left some edges clear, those are the areas used for gluing the parts together.

Then I covered the pieces with wool fabric. I usually use thinner fabrics, but this suited the style of the chair best.

Here the parts are glued together to make the basic form. You can also see how the edges of fabric were cut into flaps and glued to the other side of the cardboard.

Next, I made the back piece, which is one continuous piece covering the sides and back of the chair. The cardboard pieces are actually a bit longer than the ones for the inside part for a reason I will explain later. I glued the cardboard pieces to the felt, leaving small gaps where they need to form 90 degree angles.

Next,I covered the outside of the back piece with a piece of the same wool fabric. I also glued some of that fabric to the bare parts of the already constructed "inner chair". That was to make a more even surface for gluing the back in place.

Then the back just needed to be glued in place. Here you can see why the outer pieces were longer. Once you make a rectangular piece to close the gap that will be left under the front edge of the seat, the seat will look thicker and the chair will look more authentic.

Here is a picture of the finished chair, with a doll to show the size. The legs of the chair are just round pegs cut to length, glued in place and painted brown.

Saturday, January 8, 2011
Dresses for Bobo
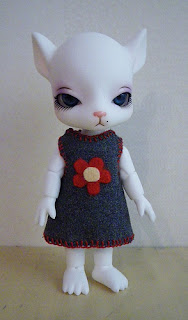
My latest doll purchase is Doll Factory's Pet Ari 2nd Edition Bobo. She's a very small BJD doll, but as she is a mouse, she fits in well with the Baha Cat.
Before she even arrived, I started making her some dresses using Mattel's Kelly/Shelly doll as their measurements are almost the same. Bobo is more pear shaped, though, so the dresses had to be loose at the hips.
Here are pictures of dresses I have made for her. I used the same pattern for all of them and just varied the fabrics and decorations. The pattern is available as a PDF file on my web site.
Dress with an iron-on picture:

Wool fabric with a felt flower in front and cotton yarn on the edges:
Slightly shortened pattern and lace added to the hem:

Before she even arrived, I started making her some dresses using Mattel's Kelly/Shelly doll as their measurements are almost the same. Bobo is more pear shaped, though, so the dresses had to be loose at the hips.
Here are pictures of dresses I have made for her. I used the same pattern for all of them and just varied the fabrics and decorations. The pattern is available as a PDF file on my web site.
Dress with an iron-on picture:

Wool fabric with a felt flower in front and cotton yarn on the edges:

Slightly shortened pattern and lace added to the hem:

Sunday, November 7, 2010
Hat for the Baha cat
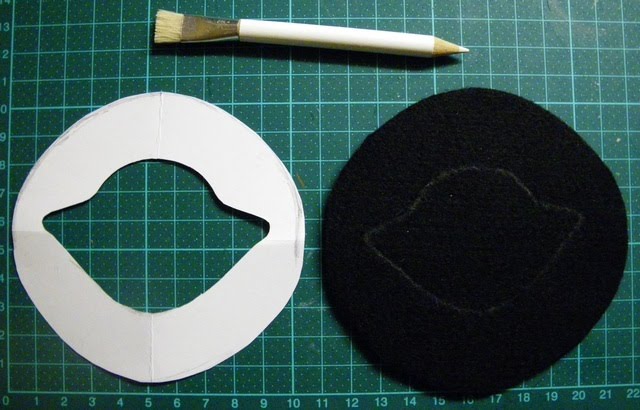
Before starting to make the hat for Brother Dreary, I wanted to test the technique with the Baha cat. I bought 4 mm thick black felt for the purpose.
First I made a paper pattern to get right size of hole in the middle of the brim. The ears were the main problem and the hole also needed to be the right shape to allow them through without needing a too big hole.
The felt was a bit difficult to cut, so I needed to draw the hole on the felt before cutting. Usually I just attach the pattern on top of the material to be cut.

Here are the necessary pieces:

I started assembly by gluing the vertical parts to the top.

Then I glued this to the brim.

Here is the hat seen from below. I'm thinking of gluing light-colored band to the inside where the felt touches the doll's head to avoid any staining.

This is how the hat looks on the doll:

The pattern for the hat is available on my web site.
Related earlier posts:
Brother Dreary project
Socks and the beginning of the vest
Parts of the vest
Baha Cat's vest and stuff for Brother Dreary
Sewing the large vest
First I made a paper pattern to get right size of hole in the middle of the brim. The ears were the main problem and the hole also needed to be the right shape to allow them through without needing a too big hole.
The felt was a bit difficult to cut, so I needed to draw the hole on the felt before cutting. Usually I just attach the pattern on top of the material to be cut.
Here are the necessary pieces:

I started assembly by gluing the vertical parts to the top.

Then I glued this to the brim.

Here is the hat seen from below. I'm thinking of gluing light-colored band to the inside where the felt touches the doll's head to avoid any staining.

This is how the hat looks on the doll:

The pattern for the hat is available on my web site.
Related earlier posts:
Brother Dreary project
Socks and the beginning of the vest
Parts of the vest
Baha Cat's vest and stuff for Brother Dreary
Sewing the large vest
Subscribe to:
Posts (Atom)
