


I have shown some of the doll clothes in the video in an earlier post, but in the video, you can also see pictures from the book, showing the original outfits.
Showing posts with label 1/6 scale. Show all posts
Showing posts with label 1/6 scale. Show all posts
Sunday, March 27, 2022
Wednesday, December 9, 2020
Building a miniature photo shoot set
Many of the photo shoot sets for the 6th Scale Stories are in my bookshelf. However, I use some temporary sets that I build up for a photo shoot and take down right after. I decided to use some leftover pieces to build an easily movable platform for doing this. The left wall is the top of a bathroom cabinet, the right wall is a couple of pieces from my bookshelf, and the floor is a piece of particle board (the longer piece) and a piece from my bookshelf.

The pieces are attached together with angle irons and the structure has wheels on two sides, so it can be turned to have a smaller floor and higher walls.

Here is one set ready for shooting photos. There is a separate piece of board on the floor to make it square as I did not have a suitable piece to add to the corner, so the actual structure's floor remains L-shaped. This set is one end of Twyla's (or her late grandfather's) study. The fireplace is embedded into the wall where the arched hole is, so it is fairly deep and has a small led light under pieces of wood for fire. The wallpapers are attached to pieces of cardboard, which in turn are attached to the walls with clamps.

Below is a final photo shot using this set (from Hitman Revisited). The idea is the same as in shooting movies, you crop the picture to leave out anything that tells you this is not a whole room. I've got another set of furniture for the other end of the study, and there's slight overlap in the middle to enforce the impression that it is one room. The carpet also gets turned 45 degrees to left when setting up the other end of the room.

Friday, October 4, 2013
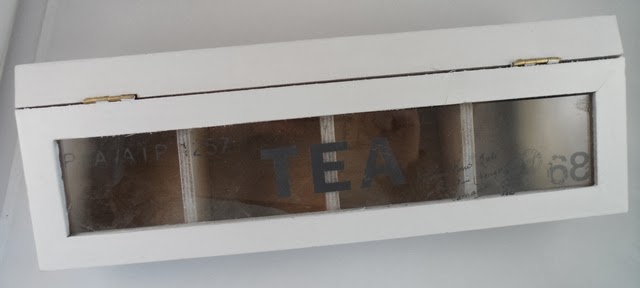
1/6 scale cabinet with lights
I got this tea box for converting it into a 1/6 scale cabinet. The first task was to remove the painted text from the glass.

Acetone worked well for that and removed all traces of paint.

Then I painted the box inside and out. I covered the glass with masking tape during the painting stage, although any extra paint would have been easy to remove with acetone.

Then I got the idea of installing lights to the cabinet. I made holes for the lights on the side of the cabinet and used wooden strips painted to the same color as the outside of the cabinet to hide the light installation. The lights are in a chain of 10 battery operated LED lights. There are two lights per shelf and the two extra ones are attached at the back of the cabinet for now. I will probably build some sort of decorative display on top of the cabinet and use those lights in it.

Friday, August 16, 2013
Monster High mugs in 1/6 scale
When I made the heels for Monster High shoes using wooden cigarette holders, I was left with pieces of round wooden tubes and wondered what I could do with those. I decided to use them to make mugs for 1/6 scale sets. The heart-shaped plastic decorations are for making the handles.

Here are the tubes sawn into suitable length and the plastic pieces cut to shape.

Then I glued the handles in place, glued cardboard to the bottom of the mugs, and painted everything with white acrylic paint.

I found these small Monster High stickers the other day and thought they would be perfect for this purpose.

I applied one coat of glossy sealer, let dry, attached the stickers, and applied two more coats of sealer to get really glossy surface.

Thursday, August 15, 2013
1/6 scale bar furniture
I have been making a 1/6 scale bar set in my bookshelf. I had a bar desk made of cardboard, but I wanted to have proper furniture for the new set.
First, here is the bar desk made mostly of balsa wood. The first photo shows it upside down before attaching the legs, so you can see the basic structure.

Then I added legs. The wooden strip in the front edge made the desk front heavy, so the front legs had to be attached right behind the strip.

Here is the finished desk painted with acrylic paint and the top has scrapbooking paper attached to it, because balsa wood was too soft for the top. The final stage was applying sealer all over.

The next piece is a small table with a tap and sink and it will be behind the desk, against the side wall. The table top is a piece of cardboard with wooden strips around it and a hole for the sink. The sink is from a package of 4 AA batteries.

Here is the same seen from below. I glued some pieces of wood and cardboard for support.

All the wooden parts are painted with acrylic paint, but for the sink, I used Revell paint meant for painting plastic scale models. The pipes are made of wood, except for the "S" piece, which is made of modeling clay. The white strips are made of cardstock and help to keep the pipes in place.

Here is a view from above. I made a hole in the bottom of the sink and carved a little hole in the "S" pipe. Then I painted the parts visible through the hole black.

The final step was to make a tap and attach it to the top, making sure it matches the location of the pipe underneath. The tap is made of modeling clay. I first made the curved part and baked it alone. Then I made the bottom part around it and baked the two pieces together. I made the hot and cold water taps separately, baked them and then glued them in place. Then I painted the assembled tap white using acrylic paint. Finally, I used a hole puncher to cut red and blue round pieces of paper and glued them on the taps. As the paint was matte finish, I applied sealer to get more dirt-resistant surface.

The third piece is a shelf for bottles and other items needed in a bar. This is a very simple structure made with wooden cigarette holders and pieces of cardboard. The first photo shows the upper and lower pieces after assembling them separately.

Here is the finished shelf in its place in the set. It only needed two coats of paint and one coat of sealer after assembly.

Friday, July 12, 2013
Furniture
Here are pictures of some furniture I have made. The first ones are in 1/12 scale.
This rocking chair came as a part of a kit, so I have only assembled and painted it.

The same kit also contained a dining table and chairs, which I painted and then decorated with some printed cardstock.

This chair is from a set of finished furniture made of untreated wood. I painted the parts that would remain visible and then covered the rest with fabric.

The next one is in 1/6 scale and mostly made of pieces that came in packages of Lundby dollhouse furniture and lights. The darker pieces are very dense and hard to saw, so the dimensions were primarily determined by the length of the pieces, so I wouldn't need to saw any more than was absolutely necessary.

Here is the finished bench.

Tuesday, December 4, 2012
1/6 scale wingback chair
Usually I make doll chairs using a pre-existing structure, such as a plastic bottle, cut to shape and then covered with felt and fabric. This time, however, I wanted to try a proper chair.
I started by designing the required parts. That's actually quite easy as only the sides need actual designing, the rest are just rectangulars, and the biggest challenge is in getting the length and width right.
I cut the parts from cardboard (fairly thick, I think it came as a backing for mailed comics) and covered the insides with two layers of felt (glued in a few places to keep it in place). Note that I left some edges clear, those are the areas used for gluing the parts together.

Then I covered the pieces with wool fabric. I usually use thinner fabrics, but this suited the style of the chair best.

Here the parts are glued together to make the basic form. You can also see how the edges of fabric were cut into flaps and glued to the other side of the cardboard.

Next, I made the back piece, which is one continuous piece covering the sides and back of the chair. The cardboard pieces are actually a bit longer than the ones for the inside part for a reason I will explain later. I glued the cardboard pieces to the felt, leaving small gaps where they need to form 90 degree angles.

Next,I covered the outside of the back piece with a piece of the same wool fabric. I also glued some of that fabric to the bare parts of the already constructed "inner chair". That was to make a more even surface for gluing the back in place.

Then the back just needed to be glued in place. Here you can see why the outer pieces were longer. Once you make a rectangular piece to close the gap that will be left under the front edge of the seat, the seat will look thicker and the chair will look more authentic.

Here is a picture of the finished chair, with a doll to show the size. The legs of the chair are just round pegs cut to length, glued in place and painted brown.

Sunday, September 2, 2012
Bee
The first Create a Monster set I bought only had one torso, so I decided to make one myself. I had already ordered a couple of the expansion sets, so I decided to make the torso for the bee and paint the upper arms and legs with the correct color. The grey head is here just for reference.
The armature is made of wood and the black and yellow torso is needle felted.

This photo shows the doll before painting and also in comparison to a normal Monster High doll.

I made the stand, in which the upper legs are attached, for painting doll shoes, but as the wooden posts are made of the same round strip as the part of the torso where the legs attach, the stand was perfect also for painting the upper legs.

I used FolkArt's acrylic paint "509 Sunny Yellow" and it was a bit too yellow compared to the lower leg. I painted several coats with it and then mixed the color for the final coat by mixing Sunny Yellow and "480 Titanium White." Finally, I applied a coat of matte sealer to prevent the paint from chipping.

This was just going to be a needle felted wig cap, but I liked how it looks, so I left it as it is and will make another wig using the original plan.

Here is Bee almost finished. I'm still thinking of giving her a stinger, but I'll need to figure out how to make one. I tried using wood, but the result wasn't satisfactory, so I'll continue experimenting.

Wednesday, November 9, 2011
Greyscale Ghoulia
I wasn't quite sure what to expect as I started removing the head from a Monster High Ghoulia doll. I did it with that small screwdriver you can see in the photo. The construction turned out to be similar to Barbie's. The only reason for that odd round knob seems to be that Monster High dolls have such a thin neck that the post could not be attached to it without making that part thicker.

Next, it was time for the hair to go. I cut the hair as short as possible and then used the wide tweezers to scrape the inside of the scalp to pull the hair in. When everything was inside the head, I used the other tweezers to pull it all out (those tweezers are easier to use as you press to open them, so their "default position" is closed).

After removing all original paint using acetone, it was time to apply some new. I used Folk Art's acrylic paints and mixed the different shades myself.


I had thought that I would do a reroot, but I came across the perfect yarn for her hair and it was too thick for rerooting (or at least I couldn't figure out how it could be done). So, I used a sewing machine to sew the strands together for easy gluing. It's fairly easy when you arrange the strands on top of baking paper and sew at least twice across them. When finished, you just need to rip off the paper (by this time, it will have so many holes in it that it will be easy to remove).

I used three strips: back, front, top. The top one is sewn from the middle to make a parting. I used PVA glue to glue the hair in place as it has worked with a smaller doll I customized earlier. If it won't hold, I'll use super glue to glue it back. Even if I have to resort to that, the first gluing won't be a waste of time as I expect super glue to work better when there will be a smooth surface (the PVA glue strip in the hair) against a smooth surface (the vinyl).

And here Ghoulia impersonates Cousin Itt as she waits for the glue to dry.

Finally, photos of the finished doll. She's wearing a business suit for now as I haven't yet made her outfit. The boots are the ones I made for Draculaura a while ago.


Subscribe to:
Posts (Atom)
