


This is the second part for the video in the last post. It's about the best of the three books, which has patterns in three different sizes for Tonner and Madame Alexander dolls.
Showing posts with label dress. Show all posts
Showing posts with label dress. Show all posts
Sunday, April 3, 2022
Saturday, March 26, 2022
How to make button loops
I was making an evening gown and ended up making the button loops from scratch, that is, using the same fabric I was using for the main parts of the dress.
Thursday, January 6, 2022
Making the neckline of the yellow bodice
In this video, I'm showing how to alter a dress pattern to make the notched neckline of the yellow bodice shown in an earlier video. You need to know how to make a dress with a lining, because I'm only showing the changes needed for the pattern and what needs to be done differently when sewing the dress.
Friday, December 24, 2021
The dress prototype & some school projects
Here are the latest two videos, which I haven't posted here yet.
First, I finished the prototype of the dress with lining, so I can use it at home.
The second one is about the school projects after I finished the mascot heads.
Sunday, October 17, 2021
The rest of the pinstripe fabric
I had bought 4 meters of the pinstripe fabric, and to my surprise, there was still plenty of it left after the three pieces (blazer, vest and pants) I had planned to make. My first idea was to make a skirt using the rest of the fabric, but then I came across an even better idea. It was a dress that's basically a combination of a vest and a wrap around skirt. It is from Burda 2/2020, pattern 113.

I used the pattern, but discarded the instructions after reading them and finding them unnecessarily complicated. Also, I had to make some alterations and that would be easier with a different sewing order.
I started by making the bodice. I used the same lining fabric as for the pinstripe vest. The main difference in this dress was that the facing was much wider.

Here is the bodice ready for sewing the waist seam. So it's basically a vest with the hem seam left open.

One thing I made according to the instructions were the pockets. They looked nice in the magazine pictures and were quite easy to make. I was running out of the blue lining fabric, so I used another fabric for the pockets. It's not like it's going to show, and even if it does occasionally, so what?

I sewed all the skirt pieces together, and here you can see the pockets pinned in place. The back of the dress is in the middle, so the pockets are facing the correct directions.

I sewed the lining to the right edge of the outer part (on the left in the picture). Then I sewed the upper edge to the hem of the bodice. That left part of the upper edge on the left unsewn. I sewed that part and the left vertical seam (attaching the lining) separately. The reason for doing it this way was that I wanted to get the bodice attached first, so I could then tackle the front left separately.

I didn't have quite enough of the pinstripe fabric and the front left (that would go under the front right when wearing the dress) was shorter than in the pattern. The front left should have reached the right side seam, but it ended up falling 20 cm short, even after I had made it from two pieces instead of cutting it on fold as it was supposed to. Fortunately, none of this matters as the additional seam is hidden under the front right and the missing 20 cm do not affect the wearability or looks of the dress in any way.
Finally, I turned the hem of the outer fabric and lining, and sewed the buttons. The buttonholes were another thing I made according to the instructions. They required leaving parts of the waist seam open and then finishing the edges of the holes by hand sewing. The last part was to sew a snap on button to fasten the upper corner of the front left underneath the front right at the waist.

I'm using this dress with long-sleeved shirts and pants. The weather is getting colder, so it's nice to have an extra layer on top of them. And I really like the big pockets. My mobile phone fits in there even in a horizontal position.
Saturday, March 13, 2021
Green velvet dress
The next dress made with patterns from a book is a long dress made of green velvet. The book is Rosemarie Ionker's "Fashion Doll Clothing," and the pattern is on pages 97-98. The pattern is for Madame Alexander's Alex, but I was making the dress for the CED doll Colin. That meant more resizing.
I started by resizing the pattern to the best of my abilities. I took the necessary measurements and added length and width as required.

However, I didn't trust my patterns, so I made a prototype of the bodice. I suspected the front might be too wide, which turned out to be the case. As I hadn't sewn the front middle seam, it was easy to pin it to get the bodice to the right size. All I had to do then was to adjust the patterns accordingly.

The lower part of the pattern was easier to resize as it only required adding some length. Thinking of this afterwards, the fabric wasn't the best choice for this design due to the number of panels, but I didn't think of that when I started.

After sewing all the pieces together, the dress was fitting surprisingly well. The patterns I made weren't perfect, but good for a first attempt. Maybe I'll make another dress using more suitable material now that I know what still needs fixing.

I sewed a zipper on the back, because it's the easiest closing mechanism for a dress like this. Here you can see some of the problems I had with the fabric. Fortunately, it's all in the back and out of sight most of the time.

Here's the finished dress after making the sleeves and finishing all the edges. I think it's looks nice enough, and what it especially does is give Colin a more normal body shape. I'm not quite sure what's wrong with her measurements, but she doesn't look very good in narrow skirts.

Here's a closeup of the shoes. I made these over 10 years ago, I think. The color is maybe a bit too light to go with the dress, but at least they're green.

Tuesday, March 9, 2021
Arts in the Afternoon, part 2
I did some more resizing with the Arts in the Afternoon pattern. I really like the red/gold fabric I used for Cissy's top, but unfortunately there wasn't enough of it for a skirt, so I had to use different fabric for that. It's a pity, because the outfit looks so much better when both parts are made of the same fabric.

I used velcro closing for everything else, but Cissy skirt has a proper zipper. I had a 4 cm zipper, which I sewed in place in the same way as we did in one of the exercises a couple of weeks ago.

Tuesday, December 15, 2020
Variation of the Kindi Kids dress
I finished the dress shown in a photo in the pattern file for the A line dress.

The patterns in the fabric required dividing the one piece pattern into three pieces. Also, this is 100% cotton, so fraying would have been an issue. That is why I decided to use a lining for the dress. I sewed the side seams and then sewed the resulting piece into a rectangular piece of the lining fabric. The sewing is easier this way as the fabrics stay flat against each other better.

In the next picture, you can see which seams need sewing at this stage. The hole in the right edge is where you pull the entire thing through when turning it the right way round.

After sewing, I cut away the extra lining fabric and turned the piece. I also ironed it, because I wanted to make sure the lining wouldn't show.

I realized the shoulder seams would be really thick if sewn. So I decided to glue them instead. I used PVA glue and glued a piece of ribbon first on the outside and then, after the glue had dried, folded it on the inside and glued it there as well. This should be strong enough to form a shoulder seam. After the glue was all dry, I trimmed the ribbon so it was level with the edge of the armhole.

The final step was adding velcro closing on the back. The next photo shows the doll wearing the dress. For the shoes, see the Fashion Doll Shoes blog.

Monday, December 14, 2020
Housecoat/dress made of old flannel shirts
I had some old flannel shirts that had belonged to my dad. They were too big for me, so I decided to make something else out of them. As a starting point, I took a dress called "Lankku" (Plank) by Nanso. It's a good fit for me and very comfortable, so I used it to make patterns out of what was left of the old duvet cover.

There was no way to cut entire pieces out of the flannel, so I divided the pattern into pieces and then cut pieces of flannel as shown in the next picture. These pieces took two shirts to make, so I knew at this point that I'd have to use the third one as well.

I combined the pieces by overlapping the edges and using a stitch that's meant for this kind of combining. The main thing I wanted was for the garment to be comfortable, so regular seams were out of the question.

When all these seams were ready, I used strips of colorful fabrics to cover them. It made the result neater, and it was also more fun to have some cute pictures as the flannel colors were a bit dull.

I used the third shirt for the sleeves and edges. Cutting usable parts of that shirt was a bit tricky as it had some paint stains, but I managed to avoid having any stains visible. I made huge pockets for this as they need to accommodate a mobile phone and all sorts of other stuff I carry around at home. (I don't expect to wear this when going out, unless it's just quickly taking the trash out.)

The last stage was sewing buttons and button holes. I remember sewing a couple of button holes with my old sewing machine, but not buttons (I don't think it had that function). Now I decided to try doing both using my current sewing machine.
This is the foot for sewing button holes. You put the button on the back where it defines the size of the button hole, and the machine makes the button hole automatically. I made 8 perfect button holes, and then the last one (closest to the hem) got messed up somehow. I removed the stitches for that one and decided that 8 buttons was enough.

Then it was time for the buttons. The instructions in the user guide were clear enough, and the next photo shows the first ever button I have sewn using a sewing machine. I wanted to practice first on a separate piece of fabric in case I mess it up, but it wasn't that hard, you just need to be careful in positioning the button.

So this ended up being the first piece of clothing with buttons that I have ever made without any hand sewing, all done with the sewing machine.

Here is the finished dress. The breast pockets are from the flannel shirts. For the white/grey one, I cut the shirt so that I'd get the pocket in the correct place. The other pocket is from the third shirt, and I cut it out of that one and sewed in place to this.

Saturday, December 12, 2020
Easy to make dress for Kindi Kids dolls
I'm not usually interested in little child dolls, but Kindi Kids are quite cute, and their proportions are interesting in the point of view of making clothes and shoes. So I bought one, and I'm going to experiment on some techniques I wouldn't use for items I make for collectible dolls.

The first idea was making a dress using felt. Unfortunately, this turned out to be too big, so I'll need to make the orange and blue parts a bit narrower, adding two more seams, but hopefully this can be salvaged.

The nice thing about the first experiment was that it gave me a good idea on what to change in the pattern. After making the changes, the pattern can be used for making the dress below. It's one piece of fabric, only shoulder seams need sewing, and back needs some sort of a closing mechanism (velcro recommended).

The pattern is available on my web site, so you can download it as a PDF file and make as many dresses as you like. And it's also a good starting point for your own creations as it has the basic measurements and you can make changes as you wish.
Friday, November 20, 2020
Some alterations
I don't buy clothes often, so what I have I tend to use until they're ready to be thrown away. This has led to accumulation of some items I haven't been using for a long time and didn't think I would be using as they are. So, it was time for some alterations.
The first one was a fleece sweater I got for free from my last employer (I've been self-employed for 16 years now). The company's name and logo changed, and all the promotional stuff was given to employees, so I got this good quality sweater I used quite a lot for the first few years, but haven't used for some time now. It has always been too big for me (it was the smallest size available, so of course I took it as it was free), so I decided to make it a vest and take the seams in so it would fit better.

I have another project for which I'm using some old flannel shirts, so I took some of that fabric for the hem and arm hole edges. I also decided to use a patch to cover the logo. I doubt many people would even know whose logo it is as it's been so long since that name change (the company has changed its name several times after that due to mergers). I took in quite a lot from the side seams and cut the front open to sew a zipper in place.

The second piece was a maxi dress that had never felt quite right. It looked fine, but the fabric is too stiff for the length shown in the picture below.

I thought knee length would be better. It took a lot to start cutting the fabric after measuring everything twice. This is a good quality dress that wasn't cheap, and I was terrified I'd mess something up. However, everything turned out just fine as you can see in the next picture.

I have a some more projects of this type in progress at the moment. One of them is fixing cargo pants that need the hips and waist extended as they don't fit me anymore. As I was in the middle of this project, my sewing machine stopped working properly, so I had to take it in to be repaired and that took 10 days. That stopped me from finishing the project, but now I should be able to do that.
Friday, August 24, 2012
Crocheting
I really prefer the way knitted items look, but crocheting is so much easier. Here is a crocheted dress I made for a Rini doll.


The hem is made using the stitches seen in the video below.
The upper part is made using the stitches shown in the next video.
Thursday, August 23, 2012
Knitting
It's been a long time since the last post. Here is a compilation of some knitted doll clothes I have made recently. First, something for the smaller Miss Piggy.


Next, Monster High dresses from similar yarn as Miss Piggy's dress.

Then I tried some dresses with short sleeves.


Then I tried some dresses with short sleeves.

A dress for Jessica Rabbit, made with just one ball of yarn that had alternating colors.

Here is a group picture of dolls wearing knitted dresses made of the same brand of yarn (Novita puro) in different colors.

Finally, an experiment in making a knitted jump suit. It's better than my first try, but the pattern still requires some modifications.

Saturday, January 8, 2011
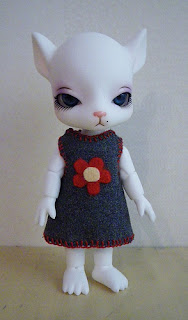
Dresses for Bobo
My latest doll purchase is Doll Factory's Pet Ari 2nd Edition Bobo. She's a very small BJD doll, but as she is a mouse, she fits in well with the Baha Cat.
Before she even arrived, I started making her some dresses using Mattel's Kelly/Shelly doll as their measurements are almost the same. Bobo is more pear shaped, though, so the dresses had to be loose at the hips.
Here are pictures of dresses I have made for her. I used the same pattern for all of them and just varied the fabrics and decorations. The pattern is available as a PDF file on my web site.
Dress with an iron-on picture:

Wool fabric with a felt flower in front and cotton yarn on the edges:
Slightly shortened pattern and lace added to the hem:

Before she even arrived, I started making her some dresses using Mattel's Kelly/Shelly doll as their measurements are almost the same. Bobo is more pear shaped, though, so the dresses had to be loose at the hips.
Here are pictures of dresses I have made for her. I used the same pattern for all of them and just varied the fabrics and decorations. The pattern is available as a PDF file on my web site.
Dress with an iron-on picture:

Wool fabric with a felt flower in front and cotton yarn on the edges:

Slightly shortened pattern and lace added to the hem:

Monday, October 4, 2010
New dresses
My purchases from the crafts fair last weekend included some really nice fabrics.

Of course I had to try them right away. The first thing I made was a dress for Nikki. You can find the pattern here.

The most challenging part for making clothes for Nikki is her tail. Here is a back view to show how I solved the problem in this dress.

Next, I made a dress for Daisy Slae (Living Dead Doll). This is a fully lined A-line dress with an open back closed with snaps. The pattern can be found here.

As I was cutting the fabric for the dress the first time, I made a mistake. Fortunately, I did not need to discard that piece as, after a little modification, it was fine for a Baha Cat's dress. So, the two now have almost identical dresses (the Baha Cat's dress is not lined and it has side seams).

Subscribe to:
Posts (Atom)
