Thursday, March 18, 2021

More pockets

After finishing the double pockets, it was time to make some more pockets for the vest. These go above the other pockets.

The first thing was to make a pattern, and I had no idea how to do that, because the pockets needed folds. However, that's what the teachers are for. It turned out to be quite simple, you just need to know what to do. In this case, it was the same thing we did when making the patterns for the bell-shaped skirt.


You make a pattern for a flat pocket, cut it as shown in the picture above, and then spread out the bottom ends of the outer parts a bit. In this case, there is 1 cm added to both corners. Then you glue the pieces in place and draw the seam allowances around the pattern created this way. When sewing, you just make folds that remove 1 cm from both corners, and the result is a pocket with straight vertical sides.

The order of sewing is: sewing and stitching the folds in the corner, hemming the upper edge, ironing the seam allowances in the sides and bottom edge, and stitching the pocket in place. With a single color fabric, you'd use either the hem or front middle to get the pockets straight, but in this case, I used the upper edge of the lower pockets, because the pictures needed to be horizontally straight.


So now the vest has all of the outside pockets. The next step is to make the lining and the inside pocket that will be sewn into it. I'm currently in the middle of making a sample of the inside pocket, because getting the zipper in place properly is a bit tricky. Best to practice first before touching the actual lining.


Wednesday, March 17, 2021

More collars

On Monday, we made samples of two of the collars we drew last week. Making them made things a lot clearer than just reading the written instructions. With the instructions, it didn't help that some pictures had been turned 90 degrees to fit into the page. Especially one of them was totally incomprehensible until I realized I needed to turn it first to get the upper edge on top. Then it started making sense.

The first collar was a simpler one for a women's blouse. It was fairly quick to make once all stages were clear.


The other one was the kind used in men's shirts. It's more complicated and requires accurate sewing, but I think it looks much nicer and neater. Once we've done some samples of slits for sleeves, we'll be making a blouse, and I think I want this kind of collar in it.


Monday, March 15, 2021

Bias Binder

I decided to take a look at what accessories are available for my sewing machine. There is a quite wide selection of presser feet, and the one I decided to get was the bias binder. This is a lot smaller than in the machines we have at school, but it doesn't matter, because this is a good size for doll clothes.


The bias binding needs to be 24 mm in width, which means the end result is 6 mm wide. This picture is from a practice piece I sewed just to see how the thing works. Straight edges are easy once you figure out the right needle placement, but I'm not sure this can be used for curves. At least the first attempt failed, but maybe I just need some practice.


Here is the piece from the picture above. The needle placement was 1.8, which is quite a bit to the left. The default needle placement makes the stitches much too close to the edge.


Sunday, March 14, 2021

Double pocket

I managed to finish the lower pockets of the vest this week. Or not quite, two corners of each pocket still need a bit of stitching, but my sewing machine isn't powerful enough to do it as there are so many layers of fabric there. So that'll have to wait until I get to the school's sewing machine on Monday.

The structure of the pocket is such that there are two pockets in one. A flat one in front and a bit deeper one behind it. Here you can see the almost finished pocket. The front pocket is accessed from the top, under the flap, and the back pocket through the opening on the side that has a zipper.


I'm giving here the basic instructions, explaining the order of things, but not all details, because a lot depends on the thickness of the fabrics you're using. I had to do some tweaking in the corners to minimize the layers of fabric, but with different kinds of fabrics, those things probably would not have been necessary. 

To begin with, you need two identical parts for the pocket, one made of the outside fabric, another made of the lining fabric. Turn the upper edge of the outer part and sew it. At this stage, the inner part should be 1 cm (seam allowance) higher than the outer part.

Sew the pieces together with a narrow strip of the lining fabric in between (this part can be seen from the outside when accessing the zipper pocket). The original vest had black lining, which looked the same on both sides, but in my version it took some thought to figure out which way the lining fabric used inside the pocket should be facing. When sewing the vertical seam that attaches the pieces together here, the inner and outer parts should have the right side facing up with the inner part on top of the outer part, while the strip in between them should be the right side down. Lay the pieces flat, turn the strip on top of the inner part, turn the edge of the strip under and stitch near the edge.


The next step is to sew the zipper. It should be entirely under the edge of the fabric, so it stays out of sight. It needs to be sewn with the right side of the outer part facing up, so you're basically going blind, but it is fairly easy to feel the zipper underneath. You just need to be very careful, if you're using a metal zipper, so you don't break the needle when sewing the horizontal part at the bottom. Here you can also see how the narrow strip in the previous picture shows to the outside.


The next step is the side of the back pocket. Sew it in place, turn the right side out, iron flat and stitch near the edge. Note that when you're stitching the upper corner, you need to first turn the seam allowance of the inner part as shown in the picture.


Turn and iron the seam allowances of the other edge. Draw the shape of the pocket to the fabric to which you're sewing the pocket, so you get the edges of the side to the correct place (to get the curved parts identical in both pockets), and sew the pocket in place. Start with the zipper, then the upper edge (the lining fabric, this is why the inner part needs the seam allowance to go 1 cm above the upper edge of the outer part) and finally the edges of the side piece. Stitch the corners neat and flat.


To get the pockets straight, you can either measure from the bottom edge or the vertical middle, but in this case, I used the fabric patterns, because anything else would have looked strange.

The very final part will be to add buttons, but that also requires machines I only have access to at school, so it'll be done later.

Saturday, March 13, 2021

Green velvet dress

The next dress made with patterns from a book is a long dress made of green velvet. The book is Rosemarie Ionker's "Fashion Doll Clothing," and the pattern is on pages 97-98. The pattern is for Madame Alexander's Alex, but I was making the dress for the CED doll Colin. That meant more resizing.

I started by resizing the pattern to the best of my abilities. I took the necessary measurements and added length and width as required.


However, I didn't trust my patterns, so I made a prototype of the bodice. I suspected the front might be too wide, which turned out to be the case. As I hadn't sewn the front middle seam, it was easy to pin it to get the bodice to the right size. All I had to do then was to adjust the patterns accordingly.


The lower part of the pattern was easier to resize as it only required adding some length. Thinking of this afterwards, the fabric wasn't the best choice for this design due to the number of panels, but I didn't think of that when I started.


After sewing all the pieces together, the dress was fitting surprisingly well. The patterns I made weren't perfect, but good for a first attempt. Maybe I'll make another dress using more suitable material now that I know what still needs fixing.


I sewed a zipper on the back, because it's the easiest closing mechanism for a dress like this. Here you can see some of the problems I had with the fabric. Fortunately, it's all in the back and out of sight most of the time.


Here's the finished dress after making the sleeves and finishing all the edges. I think it's looks nice enough, and what it especially does is give Colin a more normal body shape. I'm not quite sure what's wrong with her measurements, but she doesn't look very good in narrow skirts.


Here's a closeup of the shoes. I made these over 10 years ago, I think. The color is maybe a bit too light to go with the dress, but at least they're green.


Friday, March 12, 2021

Different collars

This has been a remote learning week, so I've been doing some exercises at home. Monday and Tuesday were all theory as I was learning about textile materials and making a Power Point presentation about them. I was also examining 10 items of clothing from my wardrobe to see what material they were made of and describe the reasons why I had chosen those clothes. 

The latter was interesting and also very revealing. I hadn't really thought about the issue, but it turns out that the price is the number one criterion for my clothes purchases. Of course I buy clothes I like, but I'm always seeking discounts by buying stuff at the "wrong" time of the year. That's the benefit of not caring about fashion, you can happily purchase clothes at the end of the season sales without worrying that they'll be out of fashion the next time the weather is right for using them.

On Wednesday, I was drawing patterns for collars. The teacher provided us with videos showing how it's done and also printouts of the finished drawings. All we had to do was to recreate the drawings with the help of the videos. That wasn't too difficult, but things started to get a bit more complicated when I read the instructions on how to make the collars. Fortunately we didn't need to make them, just draw the patterns.


I ended up making two of the simplest ones in 1/4 scale for dolls as I used the doll measurements for making the patterns. I used the leather armor prototype for the simplest collar, because the fabric is non-fraying and it was quick and easy to get a nice result.


For the other collar, I used a jacket prototype I made for Miss Piggy some time ago. I'm not sure if I'm going to finish the jacket, but it was perfect for trying the collar.


Yesterday, I was making pockets for the vest that is my next project. I've got an existing vest as a model, and it's got quite complicated pockets, which I'm recreating for my new vest. I made one prototype pocket at school before the spring break, so all the problems got sorted out then. Now I'm just making two more pockets and writing the instructions for them and drawing the diagrams for the different seams. I'm also taking a lot pictures, so I'll probably write a post about the pockets later.


Tuesday, March 9, 2021

Arts in the Afternoon, part 2

I did some more resizing with the Arts in the Afternoon pattern. I really like the red/gold fabric I used for Cissy's top, but unfortunately there wasn't enough of it for a skirt, so I had to use different fabric for that. It's a pity, because the outfit looks so much better when both parts are made of the same fabric.


I used velcro closing for everything else, but Cissy skirt has a proper zipper. I had a 4 cm zipper, which I sewed in place in the same way as we did in one of the exercises a couple of weeks ago.

I also made a dress for Miss Piggy. In this one, I used a pattern from Rosemary Ionker's book "Fashion Doll Clothing." The pattern is the skirt on page 85. I resized it to fit Piggy and then made the bodice pattern myself. In the book, the doll has a skirt and jacket, but I wanted this to be a dress, and it wasn't that hard to make a bodice of this type. The necklace is a cheap bracelet that's long enough to fit Piggy. The other 14"-16" dolls have so much smaller neck that using their jewelry on Piggy just isn't possible.


Sunday, March 7, 2021

Leather armor, part 1

Ever since I got this Eowyn's helmet and found out it fits Tyler dolls, I've been thinking of making an entire outfit for the doll to go with the helmet.


The plan has been on hold for a long time, but today I started planning some leather armor. First I made a paper pattern by wrapping paper around the doll and forming the required shape, then cutting that into patterns.


The next step was to make a prototype. I started with fabric. I had to add seam allowances to the patterns for this. The actual patterns won't have them as the edges of the leather will go side by side, not overlapping any.


This bodice turned out to be too big. Fine for a dress, not so for armor. I'll probably make a dress using this at some point, but now I'm interested in making armor.


I reduced the patterns a bit and also got rid of most of the curves in favor of straight lines. I made the second prototype out of thick felt as I wanted material that would be approximately the same stiffness as the leather I'm going to use. Below are the parts of the bodice. I decided to cut the back piece into two separate pieces as there needs to be slight curve there.


This is the felt bodice and it's the correct size considering that there will be some clothes under it. The lower part of the armor will be strips of leather sewn to the lower edge of the bodice. I'm also planning on adding some shoulder and upper arm pieces, but those can be planned later. First I'm going to make the basic piece and additional parts will be easier to plan when I've got that.


I now have working patterns for the bodice, so the next step will be to make it out of leather. I remember doing some leather decorating as a kid, so I'll need to look into that, because it would be nice to have decorated armor instead of one of plain leather.

I haven't thought about the details of the clothes that go underneath the armor, but it'll be at least a shirt and trousers. I've made some repros of historical clothing, so the designs won't be a problem. Some sort of boots are also needed, but I'll need to do a bit of research on that, because I'd like to be a bit more accurate about them.


Wednesday, March 3, 2021

Arts in the Afternoon

I'm currently much more comfortable with clothes patterns than before, so I had no trouble resizing a simple Barbie pattern to fit a Living Dead Doll. The outfit is "Arts in the Afternoon" from Mari DeWitt's book "Vintage Clothing for the Fashion Doll."

First, here is the outfit as shown in the book. I have made this for Barbie, and as it is a fairly simple design, I wanted to try it in a different size.


Here is the original pattern in the book and the reduced pattern for the Living Dead Doll.


Here are the pieces about halfway through the process. I'm not going through the process here, because of copyright issues, but you can see for yourself how this is done.


And here is the other side of the same piece. The lining is attached to the outer part, which makes sewing a lot easier. Of course you could just as well make this without a lining, which is what I usually do just to keep the seams thinner.


After this, you just sew the side seams and attach a closing mechanism, in this case pieces of velcro, and the top is finished. I made the skirt out of a rectangular piece of fabric, which I put around the doll to see where and how many darts were needed. The skirt is also lined using the same fabric as in the picture above.


Monday, March 1, 2021

The bunny bag

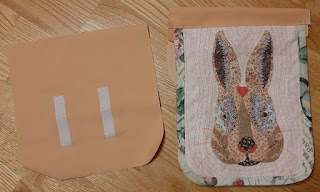
I finished the bag I mentioned in the previous post. It's made of slightly stretchy peach colored fabric with cotton and padding for the lining and the bunny picture on the flap. The picture below shows all the pieces. The structure is mostly the same as in the bag with geometrical patterns I made earlier.


This bag has a lining, and it is made in the same way as in the makeup bag, except the top is open. I first stitched the cotton and padding together close to the edges and then sewed the pieces together, leaving 1 cm seam allowances. The inside pocket was made before stitching the cotton and padding together.


I used velcro for closing as I had no buckles left. The front of the bag has vertical pieces of velcro for adjustment, while the underside of the flap has a long horizontal piece. The order of making the flap is as follows: sew the velcro into the underside piece of the flap, stitch all layers together near the edges, sew bias binding to the side and bottom edges of the flap, and finally sew the flap to the back piece of the bag.


The next step was to sew the front, back and side pieces together to form the outside of the bag. Once that is done, turn the bag right side out and insert the lining.


This is the finished bag. You can either turn the upper edges of the lining outside and stitch the edge or use bias binding for the edge. I had some issues with measurements, and it was easiest to cut the upper edge of the lining along the upper edge of the outside and use bias binding.


The shoulder strap was a bit tricky to sew in place, because of the number of layers of fabric, but my sewing machine was just able to manage it. Any more layers would have been impossible. Like with the first bag, I did not make an adjustable strap, because I haven't been adjusting the strap of the bag I originally used as the model, so that length is just right. Note also that I sewed the strap in place last. Normally it should have been sewn before attaching the lining, but as the outside fabric was stretchy, I wanted to attach the strap also to the non-stretchy lining to help the bag keep its shape.


Here is the outside of the finished bag. There are some errors that are due to the peach fabric being stretchy, but I decided to ignore them. This was basically a prototype, just for testing what the result would be like. And the most important lesson I learned is that using stretchy fabrics for something like this isn't a good idea.