Thursday, December 3, 2020

Another repaint

This was originally a drawer on wheels, the sort you have under a desk. Made of white melamine covered board and practical, but boring. Since then, it has served in various other purposes, such as housing a PC.


I went through some old photos and managed to find a picture in which you can see this as it was originally, under the desk beside the armchair. The picture was taken 25 years ago as me and my then boyfriend moved to a new place. The rest of the desk is long gone now.


At some point, I was experimenting with glue varnish and decided that the white melamine could do with some livening up. I went through all the comics I had, and as I had purchased all of the Sandman comics as trade paperbacks and only had some in a magazine format, I decided to sacrifice those magazines. It's my favorite comic, and I picked some of my favorite parts from those magazines for covering the outside, leaving the inside white at that point.

That's how it stayed for years, until I had some other painting to do and decided that the inside could do with some livening up as well. I got red paint for this, because red is bold and goes really well with the outside design.

There was only one drawer left at this point, and I decided to make some shelves instead. I used leftover pieces from a DVD shelf I had taken apart for making a dollhouse. The easiest way to attach two pieces of board together is using the kind of metal pieces you can see in the picture below. They will remain under the shelf, not visible, so it doesn't matter that they don't look nice.


After attaching the pieces together securely, there was a gap in the middle. Some filler and sanding fixed that problem. If you get the surface even enough, you can't even tell it's two pieces once the shelf has been painted. And who's looking at the surface anyway when the shelves are full of stuff?


The lowest shelf in the next picture looks flimsy. That's because it used to be a drawer and have a front, but didn't anymore. (The holes in the back wall are from the time the PC was inside this. All the cables went through there.)


I realized the lowest shelf wouldn't hold anything heavy, so I removed the remaining sides and used them to create supports underneath to make a proper shelf. I just glued the supports in place using PVA glue, because any stress to the shelf would come directly from above, so nothing would be pulling the shelf and supports apart.


When I had all the shelves I needed, I painted the inside all red. It took a few coats as paint doesn't stick to melamine very well, even after cleaning all the surfaces with turpentine. In that respect, covering the outside using varnish glue was a good idea. The only problem it has caused in all these years is that something once stuck to the top and tore a little piece of paper off. I covered the top with clear adhesive plastic to prevent that from happening again.


Wednesday, December 2, 2020

The box my dad made

My dad was a carpenter. In his day job, he made parts for glass fiber boats, but he also made various furniture for other people. These people included, for example, his employer's family members and a man who was Finland's prime minister in 1970's and 1980's (his summer cottage was near us and that's where dad did some work for him).

In Finland, we have this saying, "the shoemaker's kids have no shoes." In this case, the carpenter's family had very few items made by him, because he was always making stuff for others against a payment. However, there were some, including the box below. It was my mom's, but I got it when the house had to be emptied for sale. The box was varnished (not very carefully, the surface was a bit rough), but as I was painting some pieces of furniture, I decided to paint it as well, because there was plenty of paint.


I had white, red and brown paint, because those were needed for the other projects. I painted the inside white, because the larger compartment has a divider (seen in the picture above) that divides it into six small, deep compartments, and a light color makes it easier to see inside. I chose red for the outside as it's more cheerful that dark brown.


Here's the lid in place after the paint had dried. The box isn't really anything special in any other way, except that it was one of the things my dad made for my mom.


Here's an outside view. The box is on top of one of the other painting projects, actually the one for which I originally needed the red paint. I'll post about that later.


Tuesday, December 1, 2020

Future plans

I have been a translator for 25 years, freelance translator for 16 of those, but now it is time to do something else. I will be going back to school for a couple of years. It wasn't easy to find something that would be suitable for me, considering the limitations set by my health, but I finally decided on "Vocational Qualification in the Textiles and Fashion Industry", which sounds complicated, but what it means is that I will (hopefully) become a dressmaker.

In practice this means that my business will go on hold for a couple of years. The break is very welcome as I hadn't realized how fed up I was with my job. I also lost most of my customers due to the current crisis, so I'd need to start basically from scratch, obtaining new customers (as I don't trust the old ones would come back), and I think I can delay that for now and take my time to do something I will enjoy. I don't expect to leave translation entirely, rather I'm hoping that after the studies, I will get back to translation in a smaller scale, while also working in dressmaking in some form.

When it comes to the financial side of things, I'm glad I live in Finland. I'll be getting about 600 €/month (minus taxes) in financial aid for my studies for 15 months (1.5 years in practice, when excluding June-July). After that, I should be eligible for another form of support, which is about 250 €/month. All these are of course conditional and tied to finishing a certain amount of courses per month.

In addition to these, if I graduate, I will earn myself some extra pension. Regardless of how much time you use to finish the degree, once you graduate, you earn extra pension that corresponds to 3 years of working in a low wage job (in this case it's 3 years, higher degrees give a longer time). Of course I'll also earn the pension I'm going to be paying for during the first 15 months with the higher aid (getting it requires a valid pension insurance during that time). I think there's also a stipend you can apply for when you have graduated, but that's only a few hundred euros. Still worth keeping in mind.

So, 2021 will be the first year my business is going to make a loss. It has never been hugely profitable, but profitable enough for me to make a decent living. Like we say in Finland, it's not about the big earnings, but about the small expenses. And I do recognize that I am in some ways in a privileged position compared to young people who are just starting their career as I've paid my debts (student debt and mortgage) and have some savings to make sure I can finish my studies.

Starting from January, I will be writing about my studies as well in this blog. I'm looking forward to learning about all the aspects of making clothes. I expect I'm going to find out that I've been doing a lot of things in the wrong way, but we'll see.

Monday, November 30, 2020

Smaller upholstery project

I have had this stool for 25 years or so, and considering the time, it was in a fairly good condition, but the leather was worn and I was simply bored of how it looked. So I decided to take it into pieces and replace the leather with something else.


I'm not sure what I expected to find inside, but I was still surprised by polystyrene. I should have known, really, because of how little the stool weighted. So, it was polystyrene inner structure, plastic foam for cushioning, and leather covering.


I removed everything else and started working with the polystyrene structure. I used an old carpet to cover the polystyrene, hand sewing the pieces in place. The filling of the red pillow would become the seat cushion. The green roll is the type of plastic foam you can use under your sleeping bag when you go camping, and it was going to cover the sides of the stool.


Below you can see the green foam in place around the sides. It's main purpose is to prevent dents in the polystyrene. The round piece is an old bed sheet (100% cotton) with pieces of my old jeans sewn into it. I wanted to use the jeans fabric, but I didn't want any stretching, which is why I decided to use cotton as a base for the seat covering.


The rest of the wedge shaped pieces are made of leather. I had this gold-colored leather I bought from the closing sale of a store that sold leather goods, and I had never found any use for it. I originally bought it just because I liked how it looked. I had no plans for it at the time and hadn't had in the over a decade that followed. At least now it got some use. At this point there is a seat cushion under the covering. I made it using the same cotton.


Below are the two parts of the outer layer. I used the jeans for the sides, because I liked the idea of having pockets on the side of the stool. The blue cotton part goes under the stool.


After sewing the two parts together and getting the covering over the stool, I covered the center part inside the structure with the same cotton, because part of it was going to be visible from below. It's just a piece of fabric secured in place by tying some string around it.


Here is the bottom with everything finished. The covering is pulled tight with a piece of string.


Here is the finished stool. The seat cushion seemed a bit too curved first, and I thought I might have to adjust it, but after the stool was used for some time, the filling settled and it is now slightly flatter than in this picture.


Sunday, November 29, 2020

Leftovers from the upholstery project

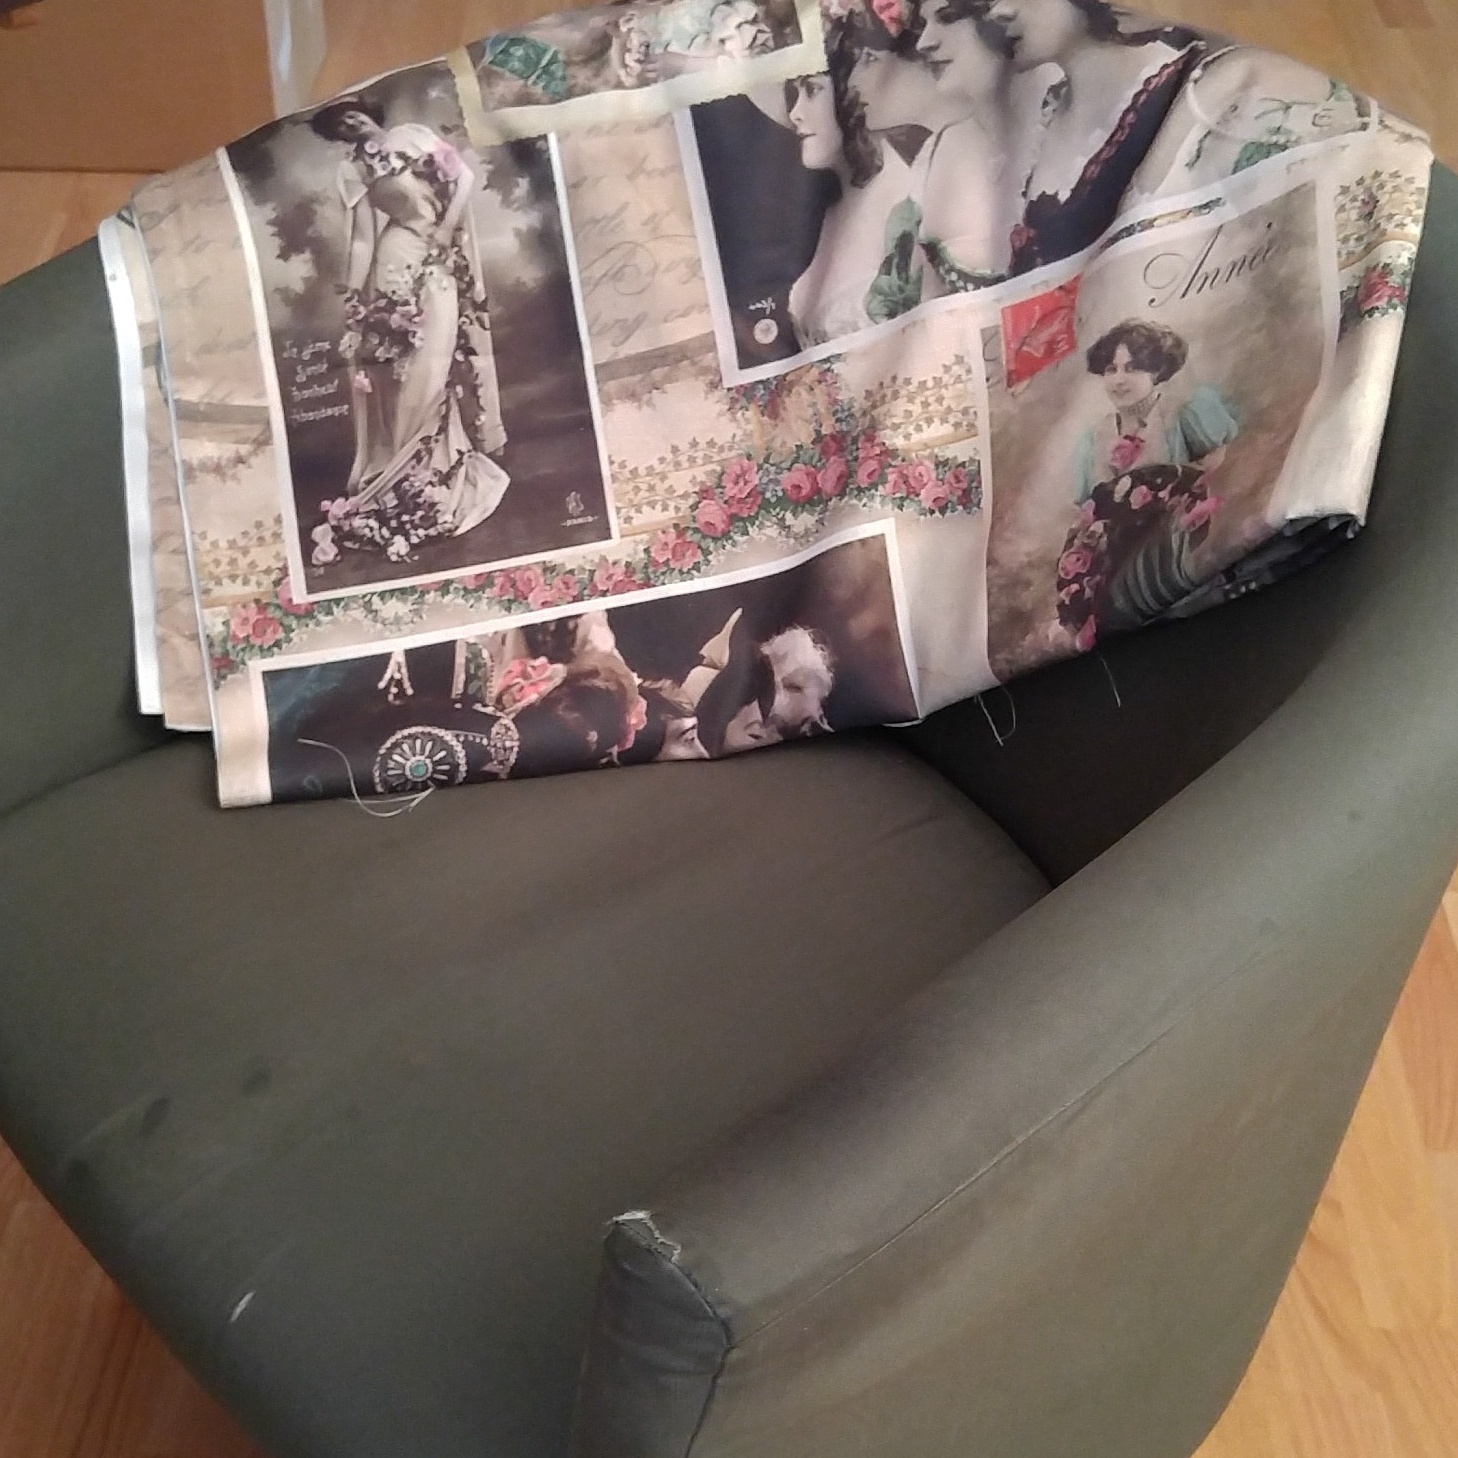
When I bought the fabric for upholstering the armchair, I had to get plenty of extra, because I needed to be sure I'd be able to align the patterns to my liking. So, after the armchair was ready, I was left with quite a bit of extra fabric and needed to figure out something to do with it. Shopping bags are always useful, so I used the fabric to make one.


This is an extra bag to be carried inside the regular bag in case I buy so much stuff that one bag isn't enough, so I also made a little pouch to keep the bag in, so it'll take as little space as possible.


In case you're wondering, I haven't been using plastic shopping bags regularly for the past 20 years or so. I always take my own bags with me when I go grocery shopping and only get a plastic bag occasionally, if I end up shopping unexpectedly and haven't had the chance to prepare for it.

It wasn't an environmental thing to start with, just about convenience, because it was so annoying to have those plastic bags accumulate in the cupboard. I used to use them as trash bin liners, but it's cheaper to buy trash bags in a roll as they are made of thinner plastic.

Nowadays I also consider the environmental effect. I've seen calculations on the total cost of using plastic bags versus a bag made of more lasting materials. I don't think those apply, when you use leftover materials for making a shopping bag yourself.

Saturday, November 28, 2020

Upholstering an armchair

I upholstered an armchair when I was 18. I had no one to ask for advice, and there was no Internet to turn to, so I had to figure it out all by myself. The result wasn't great, but it served its purpose. 

A couple of years back, I decided to try another one as its fabric was worn through in a few places and also had some grease stains. With the one I made over 30 years ago, I used black fabric, so aligning patterns wasn't an issue. With this one, I chose probably the worst possible option, but I really liked the fabric, so I decided to give it a shot.


I cut the fabric by placing it on top of the relevant part and following the seams of the existing upholstery, leaving wide seam allowances. From the beginning, the plan was to leave the original upholstery underneath and just cover it with the new fabric.


The curves of the chair made it hard to sew the fabrics together in the correct shape. I made the curved part too long and then used the narrow front pieces to tighten the fabric. At this stage, I suspected that the upholstery would remain loose in some places.


The following picture shows the structure from below. The curved black part covered the bottom of the chair, so it had to be removed. That required screwdrivers, pliers and a hammer, but I managed to remove all staples eventually.


Below is the fabric in place, the right side out, but not yet stapled to the chair. The good thing with this sort of upholstery is that you can tighten the fabric quite a bit in the stapling stage, but that presents the problem of getting an even tension to all parts of the fabric.


Here's the stapler. I don't remember why I purchased this originally as it was probably 20 years ago or so, but it was perfect for this purpose.


Below is the fabric stapled in place and with excess cut off. It did not remain loose anywhere as I was able to tighten it while stapling it in place with probably more staples than was necessary. If I ever need to remove this upholstery, I'll be regretting that.


The original cover of the seat cushion had a zipper, but I wasn't going to do that for the new cover, so I sewed the cover in place by hand. If it needs to be removed for cleaning, I'll cut the stitches and sew it back again afterwards.


Finally, here are pictures of the finished chair from different sides. I like that fabric so much. When I was cutting it, my main aim was to have the pictures as intact as possible within the panels. The curved seams and the number of panels made this difficult, but I'm fairly pleased with the result nonetheless.


Thursday, November 26, 2020

Card-woven belt

Among the card-woven bands I made a few years ago was a narrow long band that was supposed to become a strap for a bag, I think. Doesn't matter what it was planned to be, it's now a belt. I ordered a plastic buckle of suitable size, which arrived yesterday.

One end of the belt is to be fixed into the buckle, so I sewed it in place securely. The other end allows for adjusting the length, so it just needed something to make it neater and easier to get through the openings in the buckle. As the band had pink in it and I had some bright pink leather, I thought that would be a good combination. In the photo below, there are two pieces of leather glued around the end of the band. I used PVA glue as it should work fine for something like this.


When the glue was dry, I cut off the excess leather, so the end is the same width as the band. In the picture below, that end is also in place in the buckle and has been adjusted to fit my waist. It's nice to have some extra length for adjustment, although I hope I'll never need it. In the picture, you can also see better how the other end was sewn in place.